Quantcast
Channel: Blog – eForensics
Viewing all 378 articles
Browse latest View live

The WordPress user enumeration attack | Jean-Noël Haas

$
0
0

The WordPress user enumeration attack | Jean-Noël Haas

Recently I was contacted by a company that was developing a WordPress web site for a real estate agency but after making the web site public it was immediately hacked. The webmaster did not want to put the website back online until he new why it was compromised. So I was asked to determine how the attacker had gained control over the web site and then to secure it.

The investigation

I downloaded the Apache access log files and loaded them in the HttpLogBrowser and I found several suspicious activities:

Suspicious activity

First, a plugin (ubh) was uploaded from a foreign IP address (Spain) (The real estate agency was located in France). You can see that in the following screenshot (Chronological order is upwards).

A malicious WordPress plugin is uploaded by an internet user

Secondly, two themes (maxbusiness and fuence) were uploaded from a Ukrainian IP address

 A suspicious user is uploading two malicious WordPress themes

A botnet involved

After the first theme (maxbusiness) was uploaded a few hours later there was much activity on a PHP file added by this theme and the activity came from many IP addresses. You can see that in the following screenshot. 900 IP addresses requested the PHP file /wp-content/themes/maxbusiness/fonts/qfsqjiul.php installed by the uploaded theme with a rate of 50 requests per hour. Among these IP addresses only a few requested the file several times.

A botnet is accessing a PHP file installed by a malicious WordPress theme

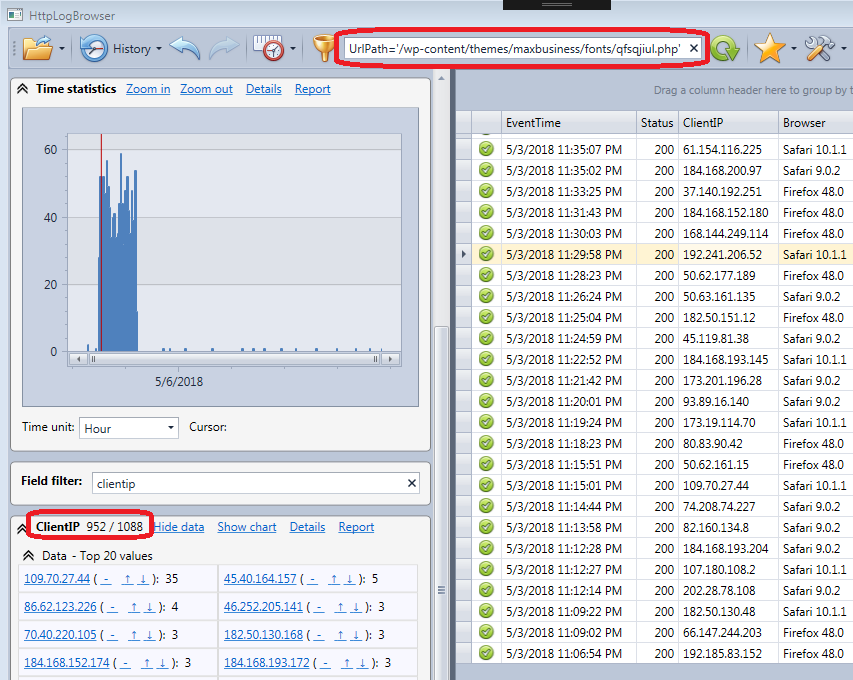
When I was doing the investigation the rogue files were already removed so I could not see the code of this PHP file. However according to what the webmaster told me, the web hosting provider cut the hosting because the web site was sending too many E-mails. So it was most probable that the mails were sent by this PHP file controlled by a botnet.

The initial attack

It was also clear that the whole purpose of the attack was to use the web site to send spam E-Mail. However at this stage of the investigation I still didn’t know how the attacker could gain admin access to WordPress in order to upload themes. So I continued to analyze the traffic that came from outside the country and more particularly from Ukraine and I found the following suspicious activity from a second Ukrainian IP address just one hour before the malicious theme was uploaded.

Attack of a WordPress web site

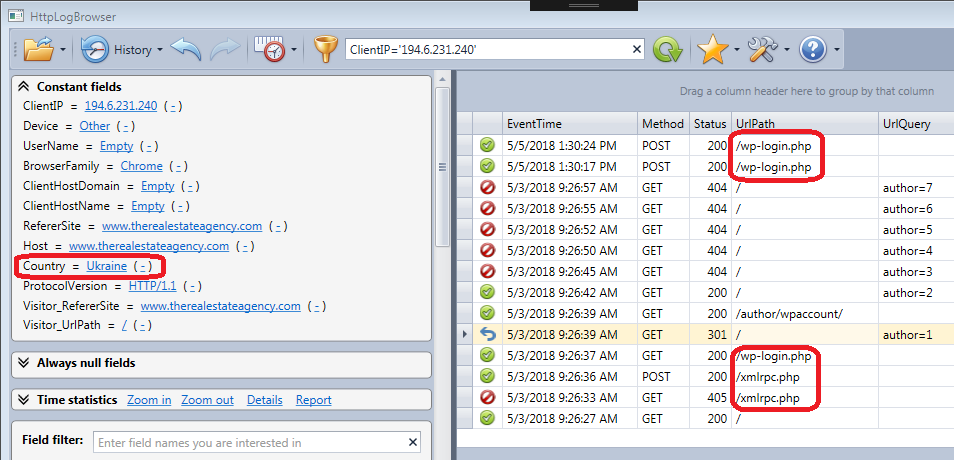
I did not immediately understand the attack but there were requests to the XML-RPC module that is known to be used to brute force passwords. There were also requests to wp-login.php, the login page of WordPress. And there were also some other web requests that were cryptic to me because I was a newbie in WordPress security at that time.

I asked then to the webmaster to put the web site back online and when I ran a security audit with Hacker Target

I saw this in the result: Warning! User Enumeration is possible

Use enumeration detected in a default WordPress installation

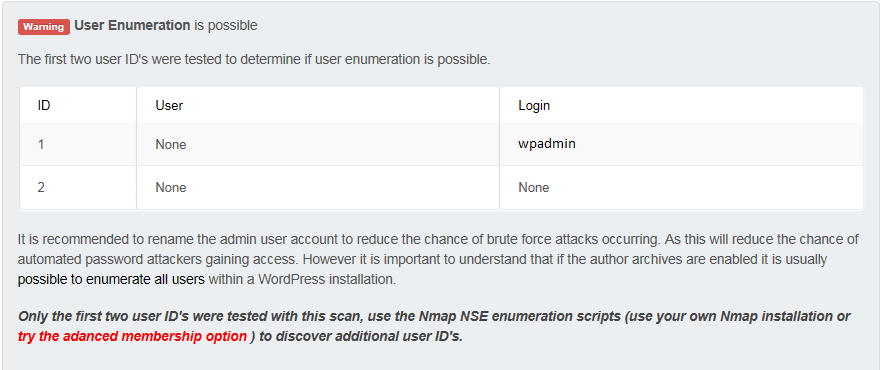
That’s something I didn’t know. It’s possible to enumerate users on a default installation of WordPress.

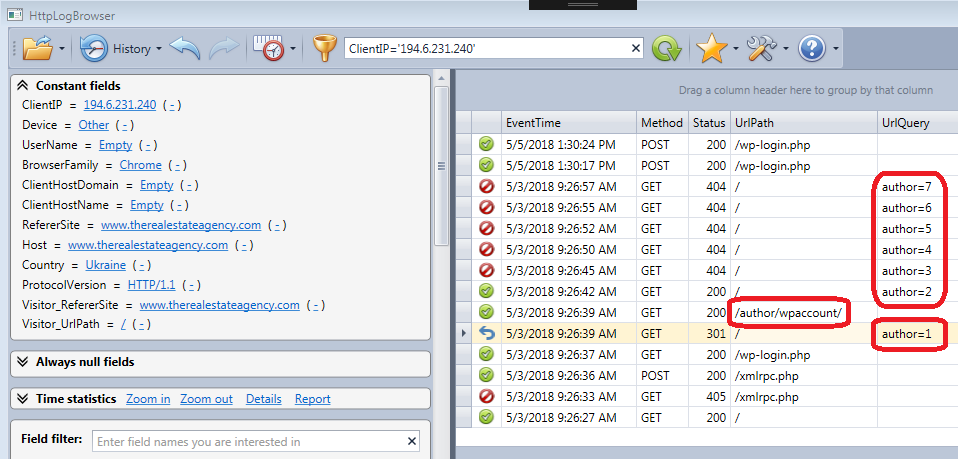
If you take a look again at the screenshot of the attack (see below) you see several requests with author=N (with N=1 to 7) as query parameter. You also see that for author=1 the request is redirected to a URL that contains the name of the admin account (wpadmin). So it’s easy to guess the account used to administer WordPress. The other requests with author > 1 lead to a 404 (not found) error because there was only one account configured.

User enumeration attack of a WordPress web site

Weak password

What was worse is that when I got the password of the admin account I saw that it was identical to the account name. The Webmaster did this by thinking that the admin account name could not be guessed by someone outside and this was the mistake.

Trying the account name as password was probably the first thing the attacker did. A brute force attack to guess the password wasn’t even needed!

Securing the web site

Strong password

After understanding that, I immediately changed the admin password with a complex password generated by WordPress itself.

Generate a strong password in WordPress

A strong password generated in WordPress

The lesson to learn from this is to never use a password that can be guessed from the account name because the account name is not a secret. Today it’s easy enough to use a complex password stored in a password manager.

Avoid user enumeration

However if needed there is a way to disable the user enumeration in WordPress and this is explained in the following article: Stop User Enumeration in WordPress

One of the two methods proposed by this article is to add the following lines in the .htaccess file located at the root of the WordPress site (If hosted by an Apache web server).

# Block User ID Phishing Requests  
<IfModule mod_rewrite.c>  
RewriteCond %{QUERY_STRING} ^author=([0-9]*)  
RewriteRule .* http://example.com/? [L,R=302]  
</IfModule>

Replace http://example.com with the base URL of the WordPress site. The effect will be to automatically redirect any request with “author=?” as query string to the root of the web site instead of the author page. We can see the effect by checking the Apache logs after the modification was done. Take a look at the following screenshot:

The user enumeration is disabled in a WordPress web site

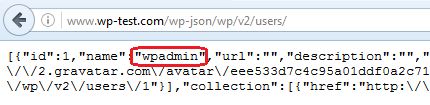
But this may not be enough because there is now a new way since WordPress 4.7 to enumerate users through the json API. The json API is only enabled if the Permalinks are not set to Plain in the settings. You can check if you are concerned by requesting the following URL on your WordPress site:
http://your-wordpress-site.com/wp-json/wp/v2/users/
If you are concerned you will get a json file with all authors with published content on the web site as in the following screenshot.

Retreves all user accounts of a WordPress web site through the json API

So here is an improved version of the rewrite rule that handles both ways to enumerate users and respond with a 403 status (forbidden). These lines need to be added before the line # BEGIN WordPress where the WordPress directives start in the .htaccess.

<IfModule mod_rewrite.c>
RewriteCond %{REQUEST_URI} ^/wp-json/wp/v2/users [OR]
RewriteCond %{QUERY_STRING} ^author=([0-9]*)
RewriteRule ^ - [L,R=403]
</IfModule>

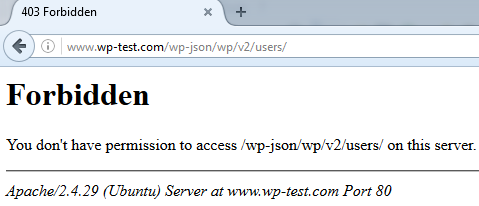
Now you get this when you try to get users through the json API:

The user enumeration of a WordPress web site through the json API is disabled

So the user enumeration can be easily stopped but what is more difficult is that user names may also be displayed by the WordPress theme at different places on the web site and if that’s the case you will need to change the code of the theme possibly at several locations in order to completely hide all account names.

Conclusion

We saw how a WordPress web site could be easily hacked by an attacker because the webmaster used the account name as password. We saw how it was possible to investigate the attack with the Apache access logs and the HttpLogBrowser to analyze them. Then we finally saw how to secure the web site against such an attack.

As last advice, it’s always important to understand how a website was hacked. Otherwise you cannot learn from your mistakes. The webmaster was maybe young and inexperienced but he had the good reflex to not put the web site back online until the problem was understood and fixed.


Originally posted: https://www.finalanalytics.com/blog/wordpress-user-enumeration-attack

The post The WordPress user enumeration attack | Jean-Noël Haas appeared first on eForensics.


Redefining OSINT To Win the Cybercrime War | by Julie Clegg

$
0
0

Redefining OSINT To Win the Cybercrime War

A large percentage of investigators in the private sector enter the industry either via law enforcement, government or the military and transition into private investigations as a second career. Others are employed by insurance companies, library sciences, research bodies or other corporations, and a small percentage of investigators come straight out of school into private investigations, security, risk management, data analysis or another related field. 

How and if someone receives formal training in online open-source intelligence (OSINT) gathering, analysis and investigations will influence which tools they employ, their knowledge of privacy and security, and their competence in applying available technology. Coupled with the skills to validate data and sources and derive useful intelligence from the abundance of raw data available via open sources on the world wide web, these attributes form the framework of successful online investigations. As it is, many online sleuths get extensive training using online tools available for free or at low cost using video tutorials demonstrating specific skills or software, in message forums or via social media. There is currently no industry standard or required qualification for OSINT investigations anywhere in the world.

Although the term “OSINT” is only now gaining recognition as a stand-alone discipline, it has been utilized since the second world war when intelligence centres and departments were created by governments to monitor, translate and verify information obtained from news media and foreign governments, along with telegrams and voice communications. The period before the widely adopted use of the world wide web can be considered to be OSINT 1.0, which was focused on telecommunications, news media and translation. The earliest available evidence of the intelligence cycle being used in military training dates back to 1948, however, research suggests it was in use before then in one form or another.

The internet revolutionized the OSINT industry by making previously unavailable information attainable. By creating and automating the processes used for gathering, analyzing, verifying and sharing data along with revolutionizing communications through the adoption of email and other direct messaging systems, users rapidly developed and deployed platforms to give every internet-connected individual a global voice. The period known as Web 2.0 brought us user-generated content, blogs, social networks, geolocation tools, and mobile apps, and accelerated the adoption and transformation of technology in every sector of business and society.

As available data and sources have expanded, finding ways to adapt established intelligence protocols to accommodate novel algorithms and processes has become more difficult, and although in theory, the intelligence cycle is a fluid framework that is still relevant for many types of data, particularly structured data or information that follows a uniform format, unstructured data is becoming more challenging to process.

Further, while data transactions are faster than ever they are also less secure, and tools designed to enhance security can be complex and cumbersome. This is the aspect of OSINT investigations that I believe is failing, resulting in substandard intelligence products and unsafe dissemination. The ever-increasing likelihood of sensitive data falling into the wrong hands or being intercepted and tampered with during transmission further puts clients, subjects and investigators at risk. 

Those professionals in the private sector who investigate high net worth individuals, international organized crime, money laundering, fraud, human and organ trafficking, child sexual exploitation, financial crime including cryptocurrency-related crime, gangs, terrorism, ransomware, hacking and any other cybercrime, have security mechanisms available at each stage of the intelligence cycle. Their effectiveness is very much dependent on their technical competence, integrity, attention to detail, and their ability to anticipate or detect threats in the online realm, as well as the tools and methods being deployed to move data around.

It is my belief that the greatest vulnerabilities to the intelligence process do not lie in the steps we all recognize, rather in the transitions between the steps during which data must invariably be exposed or moved from one platform, program or system to another. It is these “gaps” that I also believe renders the intelligence cycle obsolete, along with the definition of OSINT itself.

While robust end-to-end encryption exists, along with virtual private networks and virtual machines, these can be slow, difficult to install and manage, and not compatible with some of the tools required by investigators to effectively mine both structured and unstructured data. They are also increasingly the target of attacks, are ineffectively built and maintained, or are of questionable origin and integrity. Of the professional investigators I have spoken to, only a very small number feel competent in their use of such technologies, with generation Z and other “digital natives” being most likely to use encryption and VPN’s, and being most comfortable writing script and code to increase functionality and security. Even then, because OSINT is derived from publicly available, and therefore, unclassified, information, it is often considered non-sensitive and low risk and is treated as such. While encryption is still relatively secure, the sharp rise in data breaches orchestrated via a combination of social engineering, phishing and hacking increases the security vulnerability every time the data is accessed, decrypted, or moved.

While a wealth of information exists about digital footprints, oversharing of personal information on social media, privacy and security best practices, identity theft, data breach vulnerability and social engineering, we are in the midst of an a cybercrime crisis, with the global cost of cybercrime now estimated to be around 3.2 trillion dollars per year. This number is expected to increase to over 6 trillion US dollars by 2021. We are rapidly losing the war on cybercrime and there is no slow-down in sight. 

Organized criminals, terrorists, and corrupt governments and corporations have the time, resources and motivation to invent new, technologically advanced and dynamic ways to steal people’s money and data, while law enforcement, governments and the private sector are continually pushed to do more with less and often lack the knowledge, resources or time to stay on top of technological developments. They require fast results at the lowest cost which invariably leads to cutting corners on security and training.

For many years it has been argued in intelligence communities that the intelligence cycle is antiquated and inadequate for today’s technological environment, however, with no other framework available through which an investigator can follow a semi-structured format in investigations and OSINT production, in particular, it continues to be prescribed as the most appropriate guide for intelligence production.

The steps in the cycle, while labelled differently depending on the environment and version used, follow a very similar path:

  • Direction (also known as/includes planning, requirements)
  • Collection (also known as/includes gathering, collation)
  • Processing (also known as/includes validation, verification, exploitation)
  • Analysis (also known as/includes visualization, production)
  • Dissemination (includes decision making)

Each of these steps necessitates a broad scope of actions, often utilizing a variety of technical and digital tools. These actions include, but are not limited to, electronic or cellular communication, locating, storing, moving, analyzing and otherwise processing raw data, verifying sources and data, reformatting information, and sharing of highly confidential intelligence. Each of these steps may incorporate several micro-steps including direct messaging, downloading software and/or the use of cloud-based systems, transfer of data between hardware devices, the use of virtual machines, peer review and word processing.

There are hundreds of tools continually in development for each of these steps, some of which have become industry standards; in most cases, these are limited to certain functions relating to specific types and formats of data. While these tools are valuable to investigators and we would be severely hobbled without them, they bring a new set of problems in that, the ingestion of information and the resulting product is often incompatible with other data processing tools, the data therein cannot easily be verified or processed, cannot be presented or disseminated in a useable format, and cannot be transmitted securely to and from the platform.

As the quantity and complexity of data increases, and as organized criminals become more aggressive and creative in their efforts to obtain private information, it is my belief that the investigations industry is urgently in need of the following:

  • An impenetrable method of obtaining data from the client, including the secure transmission of large files of all media types.
  • A secure system for data storage and movement, both online and offline.
  • A secure way of accessing online data that not just protects but establishes the integrity of the investigator, the data and the investigation process. 
  • Integrated analysis of structured and unstructured data from a variety of sources and in a variety of formats.
  • A standardized process for verifying data AND it’s source regardless of structure or origin.
  • Logical written, and perhaps audio and visual reporting methods for sharing intelligence in a format usable by the client.
  • A secure way of transmitting the intelligence product to the client that maintains it’s unquestionable integrity up to and including the point of delivery.
  • A secure method for longer-term storage of evidence, communications, raw data, investigation process, timelines, and personal data that is not dependent on software or hardware versions or updates, or specific technical knowledge.

I believe that the most urgent requirement is around the security of dynamic data to prevent loss as a result of corruption, interception, or theft.  This would be followed by secure custodial systems for maintaining operational integrity, minimizing risk and securing static data. The next step would be to create conformity around the integrity of the data itself via source and data verification and then ensuring the data, once verified, cannot become corrupted. The final logical step would be to produce an intelligence product in a format that meets the needs of the client and can be transmitted securely while maintaining the integrity of the data and investigation.

While the blockchain shows great promise for data custody and control, we must be aware of the development of counter-intelligence tools including homomorphic encryption and deep fakes. Both public and private sector investigators and security workers face challenging times as technology advances and those with harmful intent, from low-level criminals that stalk and harass to cross-jurisdictional organized criminals’ intent on inflicting fear, exploitation, and terror innovate and iterate unencumbered. While those on the side of good struggle to legislate, regulate and investigate effectively, the rate of successful prosecutions continues to decline and currently sits at around 0.05%[1] in developed nations. Law enforcement, government, military and the intelligence community hold the legislative key to cybercrime reduction while corporations, start-ups and other private sector stakeholders possess the technological and innovative solutions necessary to exceed the capabilities of cybercriminals. The public and private sectors must commit to unprecedented collaboration at all levels if we are to take the internet back from the tightening grip of bad actors and win the cybercrime war.


[1] https://www.thirdway.org/report/to-catch-a-hacker-toward-a-comprehensive-strategy-to-identify-pursue-and-punish-malicious-cyber-actors

Originally posted: https://www.linkedin.com/pulse/redefining-osint-win-cybercrime-war-julie-clegg/

Author: https://www.linkedin.com/in/julieclegg1/

The post Redefining OSINT To Win the Cybercrime War | by Julie Clegg appeared first on eForensics.

Using the Volatility Framework for Analyzing Physical Memory Dumps | by Pavel Rumiantsev

$
0
0

Analyzing physical memory dumps helps you find bugs, viruses, and malware. Operating systems always create memory dump files when they crash, and these files contain information that can be useful in determining why the system went down.

Moreover, analyzing RAM dumps can be useful for improving system performance and collecting evidence of cyber crimes.

In this article, we share our experience conducting physical memory dump analysis using the Volatility Framework. This article will be helpful for developers who need to analyze RAM images and are considering using Volatility.

What are volatile memory, volatile data, and memory dumps?

Volatile memory is computer memory that requires an electrical current to retain data. When the power is turned off or the system shuts down for any reason, all data stored in volatile memory (i.e. all volatile data) is erased.

Volatile data can include browsing history, chat messages, and other application information that is often not stored elsewhere on the device and is unlikely to be recoverable. The most common type of volatile memory is random-access memory, or RAM.

RAM stores information about the current state of all running processes and services (both system-level and user-level). Due to constantly changing data, it’s impossible to work with RAM directly. Therefore, data stored in RAM can only be accessed as an image.

Memory dumps are files that contain a copy of a computer’s volatile memory at a specific time — generally, when the system crashes. A memory dump can also be defined as the process of taking all information contained in RAM and writing it to a storage drive.

A memory dump with captured RAM can be used to find information about running programs and the operating system itself.

Developers usually analyze memory dumps to:

  • Gather diagnostic information
  • Find out the reasons for a system crash
  • Find out the reasons for memory leaks, bugs, and errors
  • Find out the reasons for suspicious activities (for example, malware)
what can you find when analyzing memory dumps

Memory dump analysis is widely used in computer forensics. The goal of this field is to capture and collect digital information found on computers and digital storage media and identify whether that information can be used as evidence in legal cases. Organizations often use computer forensics as an element of the defense in depth approach to network security. For instance, organizations may use knowledge of the legal and technical aspects of computer forensics to figure out whether their network has been compromised.

There are several popular tools for analyzing RAM images, including RedlineSANS SIFTRekall Forensics, and MemGator. To show you an example of how to analyze physical memory dumps, we’ve chosen the Volatility Framework. Let’s explore the pros and cons of this tool.

Volatility Framework: pros and cons

Let’s say you’ve located malware activity in a computer’s RAM. Modern computer viruses don’t store data on hard drives. Instead, they live in RAM, which contains continuously changing data about open network connections, file descriptors (handlers), libraries, running processes, etc.

Thus, it can be challenging or sometimes even impossible to detect and eliminate malware using conventional antivirus software. What you can do is use a parsed memory image taken at the time of a suspicious activity to conduct a full analysis and detect a virus. But to do that, you need to find a tool to analyze this data.

For this article, we’ve chosen the Volatility Framework because it’s an open-source project with a large community and a significant number of plugins that cover everything you need for RAM dump analysis.

Basic information that can be retrieved using the Volatility Framework:

  • Date and time of the captured image
  • Running processes
  • Open network sockets
  • Open network connections
  • Loaded libraries for each process
  • Open file names for each process
  • Memory addresses
  • Operating system kernel modules
  • Mapping of physical offsets to virtual addresses

The Volatility Framework is currently one of the most popular tools for volatile memory analysis. This cross-platform framework allows you to work with images of volatile memory, analyze them, obtain data on past states of the system from them, and more.

The major downside of working with Volatility is the absence of a graphical interface, as it can be inconvenient to work through the command line. Also, RAM is a dynamically changing object. Therefore, there’s always a chance that you’ll get an inconsistent data state in a memory dump, leading to the inability to parse this data. So there’s no 100% guarantee that we can extract the required information from a memory dump.

Still, the Volatility Framework has lots of advantages. For instance, this tool:

  • Runs on Windows, Linux, and Mac
  • Supports various file formats
  • Comes with fast and efficient algorithms to analyze RAM dumps from large systems
  • Has a large repository that stores profiles for different operating systems
  • Shows a list of running processes and open network sockets
volatility framework pros and cons

More detailed documentation and a list of plugins can be found on the official website and on the project’s GitHub page. Now let’s explore how to analyze volatile memory using the Volatility Framework.

Analyzing physical memory dumps with Volatility

To work with the Volatility Framework, you need Python 2.6 or higher. Python is installed by default on the majority of Unix systems, but it’s easy to install it on Windows as well. To get the latest version of the Volatility Framework, download the latest sources using the git clone command or download them as a ZIP archive.

After installing Volatility, you can start working with RAM images. When analyzing data from an image, it’s necessary to use a profile for the particular operating system. A profile is a collection of data that consists of structural data, algorithms, and symbols used in a specific operating system’s kernel.

In Windows systems, profiles are stored in the source code, so you don’t have to perform any additional manipulations. For Unix systems, you have to create profiles on your own. Because of the large number of unique kernel assemblies, it’s impossible to prepare a dataset for all possible options.

You can find out more about creating Unix system profiles for Linux and macOS on the Volatility GitHub pages:

Let’s see how to get information from a RAM image of a Windows PC.

1. Identifying the system profile

To get started, we need to understand which system the dump has been taken from. This can be done using the imageinfo plugin. Execute the following request from the directory that contains the Volatility sources:

python vol.py -f %image_name% imageinfo


The screenshot below shows the output of this command:

image 1

In this case, we need to pay attention to the following fields:

  • Suggested Profile(s) — A list of likely operating systems from which the image was taken
  • AS Layer2: FileAdressSpace — A path to the analyzed physical memory image
  • Image date and time — The date and time at which the image was taken (UTC)
  • Image local date and time — The local time at which the image was captured

In our case, the version of the operating system is Windows Server 2012 R2 x64. This was suggested by Volatility, but not as the first option. Unfortunately, due to the principles of RAM operation, we can’t 100% accurately determine the system’s profile from working with the memory image. Since RAM is constantly changing, its image may not be recognized as valid by the tool at some point in time. Unfortunately, there are no tools that can more reliably do the job.

2. Calling the list of all processes

Let’s continue our dump analysis. Once we get a physical memory dump from a PC that has experienced an incident, we can analyze all running processes to find suspicious ones.

A list or tree of processes will show us the child processes of all parent processes. Then we can load a memory dump of a particular process and analyze what it was doing on the PC.

With Volatility, we can list all running processes using the pslist and pstree plugins. The pstree plugin shows a list of active processes in the form of a tree and is more detailed than pslist, which shows the linking of a process with its parent process.

To illustrate this, let’s see the results of the same request using both plugins:

python vol.py -f %path_to_image% --profile=%profile_name% pstree


image 4

The -f flag is needed to specify the path to the RAM dump:

python vol.py -f %path_to_image% --profile=%profile_name% pslist


image 2

Although this way of calling the list allows us to see all processes, we can’t know the inheritance between parents and children. Therefore, we can’t see which process triggered the suspicious activity.

Apart from plugins for viewing a list of all processes, Volatility includes lots of other helpful plugins. You can call a list of all of them using the --info command:

python vol.py --info

The output of this command includes a list of available profiles for various operating systems, a list of available address spaces, and a list of plugins.

Volatility 2.6.1 has more than 250 plugins. For example, there’s the clipboard plugin that extracts the contents of the Windows clipboard and the handles plugin that prints a list of open handles for each process.

3. Finding a list of used dynamic-link libraries

If we need to see the actions of a process, it’s much faster to view the list of libraries than to load the RAM image. The list of libraries can help us make assumptions about which manipulations with the system were performed by a particular process. Then we can decide whether to conduct further analysis.

Now let’s find the list of used dynamic-link libraries (dlls) from the postgres.exe process with the Process ID 2612 (PID 2612) by running the dlllis plugin. For this example, we’ve randomly chosen PID 2612, which isn’t a system process, from the list the postgres.exe processes.

image 3

For a more detailed analysis of this process, you can load the entire allocated memory used by this process from the original RAM image.

To do this, use the memdump plugin:

python vol.py –f% image_name% memdump –p 2612 --dump =% dump_directory%

The
-f flag indicates the path to the file. The -p flag indicates the required PID. After saving, we get a .dmp file that can be analyzed with any decompiler.

Analyzing RAM dumps for Unix systems is almost the same, except for the method of obtaining the profiles with which we’ll parse images. Due to the large number of kernel assemblies even for some of the most popular distributions, it would be challenging to create ready-made profiles as exist for Windows.

By getting physical memory dumps and using the Volatility Framework to analyze them, you can:

  • Conduct analysis at any time, even after an incident
  • Analyze physical memory dumps without affecting system availability
  • Find additional evidence of malicious activity in the memory image if you have already noticed suspicious processes (for example, processes accessing system files or shady IP addresses)

If any malicious process is detected after taking the steps described above, this information will give you a hint as to which files, processes, connections, or handlers it may affect.

Conclusion

In this article, we explored some cases of the Volatility Framework interacting with images of physical memory. This framework allows us to find out which processes run on a computer at a certain point in time — other tools like Process Explorer and its analogs can’t do that.

Memory images show the complete state of the system at the time they were taken, and they can’t be changed. Thus, Volatility can be applied to find malware, bugs, errors, and reasons for system crashes as well as to use all obtained data as digital evidence in investigating crimes related to computer information.


Originally posted: https://www.apriorit.com/dev-blog/662-cybersecurity-using-volatility-framework-for-analyzing-physical-memory-dumps?utm_source=linkedin-group&utm_medium=blog-feb20&fbclid=IwAR358a-Nu48ISWyRw6VXSobIlu-sOyrsav_tR1yaCUGDqCQWQsEUzA6ZQNs

Author: https://www.linkedin.com/in/pavel-rumiantsev-203922117/

The post Using the Volatility Framework for Analyzing Physical Memory Dumps | by Pavel Rumiantsev appeared first on eForensics.

SQLite3 for extracting databases [FREE COURSE CONTENT]

$
0
0

In this short video from our Ubuntu Forensics course we'll train extracting databases with SQLite3. Among other tools used to anlyze an Ubuntu system, SQLite3 is particlarly useful to get the evidence out and in front of you effectively. If you want to know more about using Ubuntu tools and analyzing Ubuntu systems join the course, for now let's just dive in!


The course aims to deepen the knowledge of the Ubuntu OS and reconstruct users’ activities by collecting of forensic artifacts produced during the work sessions in the Linux environment, such as recent documents, form history, web searches, bookmarks and downloads. We will focus not only on the analysis of Ubuntu systems, but also on the use of the Ubuntu OS as a forensic analysis tool. In fact, after an introduction to the Linux environment and the bash shell commands, the student will learn how to configure an Ubuntu workstation, optimizing it for the forensic analysis of Linux systems.

Consideration will be given to the main Linux forensics tools freely available, such as the Sleuth KitBulk ExtractorExiftool. Particular attention will be given to the most useful Linux commands in the forensic field such as ddmountgrepfind. Finally, we will address the issue of encryption and decryption of the file system through the use of the popular and powerful tools eCryptfs and John the Ripper.

Why take this course now? 

No matter what stage of your career you're at, the skills learned here will serve you well in the future. At the end of the course, you will be able to make a fully valid and thorough forensic expertise in a Linux environment through the use of only freeware tools. The very practical approach can be used both for understanding the principles behind Ubuntu OS and learning how to create scripts using the bash shell to solve custom tasks.


Related Posts

The post SQLite3 for extracting databases [FREE COURSE CONTENT] appeared first on eForensics.

Introduction to BitLocker: Protecting Your System Disk | by Oleg Afonin

$
0
0

Introduction to BitLocker: Protecting Your System Disk

If you are a Windows user and ever considered protecting your data with full-disk encryption, you have probably heard about BitLocker. BitLocker is Microsoft’s implementation of full-disk encryption that is built into many versions of Windows. You maybe even using BitLocker without realizing that you do – for example, if you have a Surface or a similar thin-and-light Windows device. At the same time, BitLocker encryption is not available by default on desktops if you are using the Home edition of Windows 10. Activating BitLocker on your system disk can be tricky and may not work right away even if your Windows edition supports it. In this article, we are offering an introduction to BitLocker encryption. We’ll detail the types of threats BitLocker can effectively protect your data against, and the type of threats against which BitLocker is useless. Finally, we’ll describe how to activate BitLocker on systems that don’t meet Microsoft’s hardware requirements, and evaluate whether it’s worth it or not security-wise.

Threats Covered by BitLocker Encryption

BitLocker encryption is not the be-all and end-all type of protection. While BitLocker securely encrypts your data with industry-standard AES encryption, it can only protect your data against a set of very specific threats.

BitLocker can effectively protect your data in the following circumstances.

Your hard drive(s) are removed from your computer

If, for any reason, your hard drives (or SSD drives) are removed from your computer, your data is securely protected with a 128-bit encryption key (users requiring higher-level security can specify 256-bit encryption when setting up BitLocker).

How secure is this type of protection? If you’re using TPM protection (more on that later), it is very secure; just as secure as the AES algorithm itself (in layman view, 128-bit or 256-bit encryption are equally strong).

If, however, you have enabled BitLocker on a computer without TPM, then BitLocker encryption will be just as secure as the password you set. For this reason, make sure to specify a reasonably strong, reasonably long and absolutely unique password.

The entire computer is stolen

If your entire computer is stolen, the security of your data depends on the type of BitLocker protection you are using as well as on the strength of your Windows password. The most convenient method is “TPM only” (more on that later); this is the least secure method as well, because your computer will decrypt the hard drive(s) before you sign in to Windows.

If you are using “TPM only” protection policy, anyone who knows your Windows account password (or your Microsoft Account password, if you are using a Microsoft Account as your Windows 10 login) will be able to unlock your data.

TPM + PIN is significantly more secure; in a way, it is practically as secure as a bare hard drive.

If you set up BitLocker protection without a TPM or Intel PTT installed, you’ll be forced to using the password. In this case, the data will be as secure as your password. BitLocker is designed to slow down brute-force attacks, so even a 8-character password can provide secure protection to your data.

Other users on the same computer

 If anyone can log in to your computer and access their account, the disk volume has been already decrypted. BitLocker does not protect against peer computer users.

Malware/ransomware and online threats

 BitLocker does nothing to protect your data against malware, ransomware or online threats.

In other words, BitLocker is great when protecting your data against the removal of the hard drive(s); it’s perfect if you want to protect your data if you sell or RMA your hard drives. It’s somewhat less effective (depending on your policies) when protecting your data if the entire computer is stolen. This is it; other usage cases are not covered.

System Requirements

Most of us are used to “System Requirements” being a mere formality. This is not the case with BitLocker. In order to protect your boot device with BitLocker, you must be running Windows 10 Professional or higher. Windows 10 Home does not support BitLocker system encryption.

To make things more confusing, Microsoft does support BitLocker device protection even on devices with Windows 10 Home. Effectively, this is the same encryption, just with some limitations. BitLocker device protection is available on thin and light devices (e.g. Microsoft Surface) supporting Connected standby and equipped with solid-state storage. Those devices must be equipped with a TPM2.0 module or Intel PTT technology.

If you are using Windows 10 Professional or higher with TPM2.0 or Intel PTT, you can enable BitLocker straight away. However, most computers are not equipped with TPM modules, and only newer-generation computers (think Intel 8th and 9th Gen motherboards; some higher-end motherboards may support Intel PTT with older processors) support Intel Platform Trust Technology. Intel PTT is not even enabled in BIOS by default; you must manually enable the thing to use it for BitLocker protection.

Here’s how you activate Intel PTT on Gigabyte Z390 boards (latest BIOS):

Alternatively, you can perform a Group Policy edit to enable BitLocker without hardware protection modules.

If your computer meets the requirements (namely, the presence of a hardware TPM2.0 module or software-based Intel Platform Trust Technology), enabling BitLocker on your computer can be as easy as opening the Control Panel and launching the BitLocker Drive Encryption applet. Note that not all editions of Windows 10 can use BitLocker protection.

Once you click on “Turn on BitLocker”, Windows will prompt you to create an escrow key (BitLocker Recovery Key). It is highly advisable to do so. On a balance, storing the recovery key in your Microsoft Account might be a good enough option for most home users, while employees will store their recovery keys in their company’s Active Directory. Saving the key into a file or printing it out are also valid options that will provide just as much security as your personal safe box.

Thin and light devices (such as Windows tablets and ultrabooks) may be protected with device encryption as opposed to BitLocker Drive Encryption. The algorithm is essentially the same; however, the compatibility requirements are different. Device encryption is available for thin and light devices running any Windows 10 edition, while BitLocker Drive Encryption is not available to Windows 10 Home users. If you have data to protect, you’ll need to pay a fee for an in-place upgrade to Windows 10 Professional.

What if you already have Windows 10 Professional but don’t have a hardware TPM2.0 module? If you are using one of the latest boards based on Intel chip sets, you may be able to activate Intel Platform Trust Technology (How To Enable BitLocker With Intel PTT and No TPM For Better Security) or perform the following Group Policy edit to enable BitLocker:

  1. Open Group Policy Editor (type gpedit.msc in the Windows Search box)
  2. Open Local Computer Policy > Computer Configuration > Administrative Templates > Windows Components > BitLocker Drive Encryption > Operating System Drives
  3. Edit the Require additional authentication at startup policy
  4. Set the policy to Enabled and check Allow BitLocker without a compatible TPM as shown on the screen shot

Speaking of the policies, BitLocker supports various methods of authentication, each offering a unique trade-off between security and convenience.

  • TPM only. Your system will boot to login prompt; the data will be decrypted with a key stored in the TPM (or Intel PTT) module. This is the most convenient option that effectively protects hard drives, but offers weaker protection if the intruder has access to the whole system (computer with TPM and the hard drive).
  • TPM + PIN. In this mode, the TPM module will only release the encryption key if you correctly type the PIN code during pre-boot phase. Even though the PIN code is short, entering the wrong PIN several times makes TPM panic and block access to the encryption key. This option arguably offers the best balance between security and convenience, combining “something that you have” (the TPM module) with “something that you know” (the PIN code). At the same time, this option may not be convenient in multi-user environments.
  • TPM + USB Key. This option requires both the TPM and a USB flash drive (or CCID smartcard) to be present in order for the system to boot.
  • TPM + PIN + USB Key. Just as the name suggests, this option requires all three of the TPM, PIN code and USB key/smartcard in order to boot your computer. While this is probably the most secure option, the additional security benefits are hardly worth it compared to the TPM + PIN option if you consider the reduced convenience and reliability (you’ll have to use the recovery key if a USB key or smart card gets lost or corrupted).
  • USB Key. This option is only recommended if your computer is not equipped with a TPM module and does not support the Intel PTT.
  • Password only. Just like the previous option, “password only” authentication should only be used if no TPM or Intel PTT is available. Note that the “password” option is different from the “PIN” as there is no enforceable limit on the number of password attempts without a TPM, which allows a brute-force attack on the password.

Advanced users and system administrators can refer to BitLocker Group Policy settings in Microsoft Knowledge Base.

What caveats are there when it comes to securing data against physical extraction? The thing is, while BitLocker is nearly a 100% effective solution for protecting the bare drive, it might not be as secure if the intruder has access to the entire computer with the hard drive installed. Even if your computer is equipped with a TPM2.0/Intel PTT module, Windows will still unlock the encrypted hard drive if Secure Boot conditions are met. This in turn opens numerous vectors of attack that may allow the intruder to intercept the on-the-fly BitLocker encryption key and decrypt the hard drive. These vectors of attack include:

  1. Making a RAM image of a running computer with BitLocker volume(s) mounted. This can be done via a Thunderbolt attack (Windows, by default, does not disable Thunderbolt DMA access when locked) or a cold boot attack.
  2. Breaking or extracting your Windows logon password (e.g. extracting from your Google account, your smartphone, or from another computer you have logged in and synced your data to).
  3. Obtaining your BitLocker Recovery Key from your Microsoft Account or Active Directory.

Advanced users and system administrators can read the following guide to secure their BitLocker volumes: BitLocker recovery guide

Conclusion

Reliable data protection is impossible without protecting your boot device. BitLocker is the perfect choice. It’s secure, convenient and highly configurable, allowing you balance security and convenience to your precise requirements. If you are concerned about security of your data, protecting your boot device with BitLocker is an absolutely mandatory step and the most important security layer.


Originally posted: https://blog.elcomsoft.com/2020/01/introduction-to-bitlocker-protecting-your-system-disk/

The post Introduction to BitLocker: Protecting Your System Disk | by Oleg Afonin appeared first on eForensics.

CTF: Bandit Level 0 Walkthrough

$
0
0

CTF: Bandit Level 0 Walkthrough

These first few posts on the CTF challenges at ‘Over the Wire’ will be pretty short and basic which I am ok with, the whole purpose of ‘Over the Wire’ is to go from being an absolute beginner with ‘Bandit0 to Bandit34’ through to the others like Narnia and Maze.

Suggested order to play the games in

  1. Bandit
  2. Leviathan or Natas or Krypton
  3. Narnia
  4. Behemoth
  5. Utumno
  6. Maze

Each shell game has its own SSH port, information about how to connect to each game using SSH, is provided in the top left corner of the page. Keep in mind that every game uses a different SSH port.

For Bandit0 it says:-

“Note for beginners

This game, like most other games, is organised in levels. You start at Level 0 and try to “beat” or “finish” it. Finishing a level results in information on how to start the next level. The pages on this website for “Level <X>” contain information on how to start level X from the previous level. E.g. The page for Level 1 has information on how to gain access from Level 0 to Level 1. All levels in this game have a page on this website, and they are all linked to from the side menu on the left of this page.

You will encounter many situations in which you have no idea what you are supposed to do. Don’t panic! Don’t give up! The purpose of this game is for you to learn the basics. Part of learning the basics is reading a lot of new information.

There are several things you can try when you are unsure of how to continue:

First, if you know a command, but don’t know how to use it, try the manual (man page) by entering “man <command>” (without the quotes). e.g. if you know about the “ls” command, type: man ls. The “man” command also has a manual, try it. Press q to quit the man command.

Second, if there is no man page, the command might be a shell built-in. In that case, use the “help <X>” command. E.g. help cd

Also, your favourite search engine is your friend. Learn how to use it! I recommend Google.

Lastly, if you are still stuck, you can join us on IRC

You’re ready to start! Begin with Level 0, linked at the left of this page. Good luck!

Note for VMs: You may fail to connect to overthewire.org via SSH with a “broken pipe error” when the network adapter for the VM is configured to use NAT mode. Adding the setting IPQoS throughput to /etc/ssh/ssh_config should resolve the issue. If this does not solve your issue, the only option then is to change the adapter to Bridged mode.”

So let’s begin.

Bandit Level 0

Level Goal

  • The goal of this level is for you to log into the game using SSH.
  • The host to which you need to connect is bandit.labs.overthewire.org, on port 2220.
  • The username is bandit0 and the password is bandit0.
  • Once logged in, go to the Level 1 page to find out how to beat Level 1.

As I said, very basic which is great as you can not feel daunted at all going into it, I have a fair amount of Linux experience from a previous job and because I use it a lot at home so the first few for me was easy.

We need to connect to the game using SSH so simple enough as the command is just SSH, we need to use the username bandit0 to connect to bandit.labs.overthewire.org on port 2220.

The command is:-

SSH bandit0@ bandit.labs.overthewire.org -p 2220

To break it down SSH(to SSH on) badit0(username)@(use the username @ this address) bandit.labs.overthewire.org(address to connect to) -p(port to use) 2220(port address).

It’s quite funny because I did spend about 25 minutes failing at this because I read the port as 2200 and not 2220, really need to wear my glasses more.

I did toy with doing walkthroughs for 0 to 5 then 5 to 10 etc but I like the idea of having each in its own post.

Bandit0 = https://overthewire.org/wargames/bandit/bandit0.html


Originally posted: https://thesecuritynoob.com/ctf-walkthrough/ctf-bandit-level-0-walkthrough/

The post CTF: Bandit Level 0 Walkthrough appeared first on eForensics.

Automated response based on Alien Vault alerts | by Mohammad Larosh Khan

$
0
0

Automated response based on Alien Vault alerts

Scope

AlienVault OSSIM generates various alarms and it's quite possible that the analyst may miss some of the alarms that could have a devastating impact on our infrastructure. To cater this scenario, we developed a system for automated response to ensure that alarms against our critical systems are dealt promptly and effectively.  

AlienVault Configuration

We configured AlienVault (SIEM - OSSIM) for continuous monitoring of our internal network and the connected devices. AlienVault is fully operational and is generating alarms based on the directives/rules that we have created and customized according to our needs. 

AlienVault allows us to create custom policies and allows the administrator to trigger one or more of the following actions against those policies.

  1. Open a ticket
  2. Email
  3. Run scripts

As we have various policies which require different actions in response to ensure their effectiveness, we opted for the third option of running custom scripts to ensure that the policy serves its purpose in an efficient manner.

No alt text provided for this image

By default, AlienVault executes a script from its root directory, so we placed our script in the root directory and we can pass along all the above-mentioned keywords as parameters for the script.It is important to know that, if you want to have the script in a directory other than root, you need to set the path relative to the root directory. This information is not present in the official AlienVault documentation and it can cause errors. In our case, we passed SRC_IP, DST_IP and DST_PORT as arguments for our script.

lalalalaal

Fig. Automation architecture diagram

Above figure shows different components of our automated response system.

To get a better understanding of this architecture let us consider a scenario.

Scenario

We have a server that has SSH enabled on it. Users can access the server through ssh. This server is added in our AlienVault as one of the assets and hence it is being monitored 24/7. We have written a directive in our AlienVault which triggers an alarm whenever three or more wrong ssh tries are attempted on this server. There is a policy defined in AlienVault that gets triggered based on this directive. As mentioned earlier, policies can have various responses. In this case, we will be executing a custom-written script that will block the particular IP from which the server has received SSH connection requests by adding the rules in PFSense Firewall by the help of Ansible server and its Playbook. This response will ensure that the adversary attacking our system gets blocked hence securing our server.

AlienVault OSSIM is an open-source security information and event management system, integrating a selection of tools designed to aid network administrators in computer security, intrusion detection and prevention.

Ansible is an open-source automation tool, or platform, used for IT tasks such as configuration management, application deployment, intraservice orchestration and provisioning.

pfSense is a free and open-source firewall and router that also features unified threat management, load balancing, multi WAN, and more[ii]

AlienVault triggers a script in response to policies we created which then calls ansible server and it eventually add a rule in PFsense [iii]

Internal working of the system 

ssh_anomaly.sh

The first script which is placed on AlienVault that gets triggered in response to policy action is ssh_anomaly.sh which takes source IP, destination IP and destination port as parameters and calls Ansible server.

#!/bin/bash


## GET Params from AlienVault

source_ip=$1

destination_ip=$2

destination_port=$3


## These are the params of PFsense firewall and can be provided with default value or change according to need

interface="wan"

type='block'

ipproto='inet'

description="blocked for ssh anomaly"


## add ssh password of server where ansible-playbook will be executed

export SSHPASS="YOUR_ANSIBLE_PASS"


## Execute script on remote server which will execute ansible-playbook with given params

sshpass -e ssh username@ANSIBLE_IP "sh YOUR_SCRIPT_PATH_ON_ANSIBLE_SERVER/add_rule.sh $source_ip $destination_ip $destination_port $interface $type $ipproto $description"

Add_rule.sh

This is the script that gets triggered from AlienVault and passes along the parameters needed for firewall rule to Ansible-Playbook

#!/bin/sh


# Params will be received from another server via ssh call (from AlienVault)

source_ip=$1

destination_ip=$2

destination_port=$3

interface=$4

type=$5

ipproto=$6

description=$7

MY_PID=$$


# Ansible ping

ansible -i INVENTORY_PATH/inventory -m ping myhosts


# Execute ansible-playbook with given params to add a rule in firewall

# Executes playbook.yml

ansible-playbook -i INVENTORY_PATH/inventory PLAYBOOK_PATH/playbook.yml --user=ANSIBLE_USER --extra-vars "ansible_sudo_pass=ANSIBLE_PASSWORD"  --extra-var type="$type" --extra-var ipproto="$ipproto" --extra-var description="$description" --extra-var sourceip="$source_ip" --extra-var destinationip="$destination_ip" --extra-var destinationport="$destination_port" --extra-var interface="$interface" --extra-var MY_PID="$MY_PID"

Replace ANSIBLE_USER, ANSIBLE_PASSWORD, INVENTORY_PATH and PLAYBOOK_PATH with your own details.

Ansible installation can be found in references [i]

Playbook.yml

This playbook edits the config file of pfSense in order add/remove a firewall rule (blocking/unblocking a particular IP on specific port etc). This script also ensures error handling via sending email report to admin in case of failure. 

---

- hosts: myhosts

  become: true

  become_user: root

  tasks:


  - name: 'edit config.xml'

    register: output

    ignore_errors: yes             

    lineinfile:

    dest: "/cf/conf/config.xml"

    regexp: '{{ item.regexp }}'

    line: '{{ item.line }}'

    with_items:

        - { regexp: '(?<![\w\d])<filter>(?![\w\d])', line: "<filter>\n<rule><type>{{ type }}</type><ipprotocol>{{ ipproto }}</ipprotocol><descr>{{ description }}</descr><interface>{{ interface }}</interface><tracker>123456789</tracker><source><address>{{ sourceip }}</address></source><destination><address>{{ destinationip }}</address><port>{{ destinationport }}</port></destination></rule>" }


  - name: Sending an e-mail using Gmail SMTP servers

    mail:

      host: smtp.gmail.com

      port: 587

      username: "YOUR_EMAIL"

      password: "YOUR_PASS"

      to: RECEIVER_NAME <RECEIVER_EMAIL>

      subject: Ansible-report

      body: "Failed : {{ output.results[0].failed }}\nChanged : {{ output.results[0].changed }}\nMsg : {{ output.results[0].msg }}"

    delegate_to: localhost

    when: item.failed == True

    loop: "{{ output.results }}"


  - name: Kill bash script

    shell: sudo kill -9 {{ MY_PID }}

    when: item.failed == True

    loop: "{{ output.results }}"

    delegate_to: localhost


  - name: Reload Firewall rules

    shell: /etc/rc.filter_configure

    when: item.failed == False

    loop: "{{ output.results }}" 
No alt text provided for this image

Screenshot of rule added in the firewall


Author: Mohammad Larosh Khan - https://www.linkedin.com/in/mohammad-larosh-khan-b84ab5172/

Contributors : This article is a combined effort of me and my colleague Sikandar Iqbal - https://www.linkedin.com/in/sikandar-iqbal-63269b129/

References

[i] https://docs.ansible.com/ansible/latest/installation_guide/intro_installation.html

[ii] https://www.pfsense.org/download/

[iii] https://www.alienvault.com/documentation/usm-appliance/policy-management/action-exec-ext.htm


Originally posted: https://www.linkedin.com/pulse/automated-response-based-alien-vault-alerts-mohammad-larosh-khan/

The post Automated response based on Alien Vault alerts | by Mohammad Larosh Khan appeared first on eForensics.

7 Cyber Security Threats In The Cannabis Industry | by Mary Walton

$
0
0

7 Cyber Security Threats In The Cannabis Industry

The cannabis business is a chief target for cybercriminals. As new cannabis businesses are being opened frequently, criminals are seeking more ways to harm the cannabis business. That’s why it’s important to know about cybersecurity in the cloud for your safety.

Vulnerability, patient data, and ease of consumer exploitations are the things cannabis industry hackers look for while picking targets. The impact of such heinous crimes can be catastrophic to both owners and consumers. Ultimately, you need to know how much cybersecurity is enough to be secured.

As new laws are being implemented regularly to protect consumers and patient data, businesses that aren’t prone to safeguarding that data could face hefty fines. The consumers might also lose their trust in the process.

So, you might wonder how these attacks occur? Hackers look for the weakest link in your security system while trying to hack into your system. This happens because of the lack of cybersecurity practices. Implementing proper security systems while knowing your shortcomings is the solution to this problem.

With that being said, let’s discuss the top 7 Cyber Security Threats In The Cannabis Industry.


#1. Phishing

Phishing is a kind of cyber-attack that disguises itself as an email from a trustworthy entity. The hackers prompt you to reveal confidential information by downloading malware into your device.

According to a study, 91% of cyber-attacks are phishing scams To save yourself from phishing, don’t download attachments from an unknown person and never share personal info with anyone.


#2. Password Management: 

Having a complex password is necessary for the protection of your cannabis business. In a recent study, it was revealed that stolen and weak passwords were the reason behind 81% of cyber breaches

Your password is the thing that stands between your information and the hacker. That’s why it’s important to create a complex password as it decreases the possibility of your information being stolen.

To safeguard yourself from this, create passwords containing at least 12 characters. Be sure to have numbers and symbols in your password. Change your password once every 6 months and you should be good to go. You can also set up security questions here such as, how long does weed stay in your blood.


#3. Beware Of Public WI-FI

With the availability of public wi-fi, hacking has also increased. Imagine you were connected to the public wi-fi while you were outside. Upon reaching home you notice that you’re missing valuable data from your device. How would that feel?

You need to be extra aware whenever you’re connecting to public wi-fi to safeguard your cannabis business data from hackers. Whether you’re in a cafe or a shopping mall, always be safe.

The best way to be safe on public wi-fi is to use VPN. You can also use the private window of your browser. The private window avoids saving your information. If you have none of those options, then it’s best not to handle any sensitive data on public wi-fi.


#4. BYOD: Beware Of Bad Apps

These days, it’s sort of a trend to use personal devices at the office. 74 percent of businesses have a bring-your-own-device(BYOD) policy

Because of a person using their device on your premise, it puts more responsibility on the shoulders of the personal device user.

Ensure that your workers have password-protected devices for work. Also, make sure that they download their applications from authorized sources.

It doesn’t matter if it’s an unauthorized app or device, cybercriminals only need one chance to steal your data.


#5. SaaS Selectively: Keep Sensitive Data Safe

SaaS stands for software as a service. SaaS is a cloud-based software service. And as cannabis business owners use a lot of these services, chances are your security is on the verge of compromise.

They might have a security solution for your SaaS application but it’s ultimately on you to maintain the security of your SaaS application. 

That’s why you must avoid sharing your SaaS login credentials with any unknown person. After using the service, log out of your SaaS application. Also, avoid logging into a SaaS application on public wi-fi.


#6. Ransomware Attacks

Ransomware attacks lock and encrypt data of cannabis businesses and demand ransom to restore access. 

The cybercriminals will encrypt any kind of data they can get their hands on to encrypt and ask for ransom. And as high technology is fuelling the budding cannabis industry, hackers are getting attracted to ask for ransoms from cannabis business owners.

Another even more frightening fact about ransomware attacks is, you never know if you’re ever going to get access to your data even after paying for ransom cure. 

Safety from ransomware attacks can be taken through a few steps. Set up complex passwords for all of your applications. From your personal use devices to your employees’ devices, ensure everyone has a strong base password. Also, restrict unauthorized access to your network by setting up a strong security perimeter.


#7. Cyber Extortion

You might think that Cyber extortion and ransomware are the same. But it’s not!

Cyber extortion means criminals will steal your data and threaten to release the data on the internet. Since your company might house a lot of confidential data, it’s important not to let any information leak out. 

The reason behind cyber extortion is crypto-currency. As cryptocurrency isn’t issued by any government, it keeps them anonymous.

Safeguarding from extortion is similar to ransomware. Complex passwords and constant security should keep you safe from extortion.


Conclusion

While these are the top 7 cybersecurity threats in the cannabis industry, there are more. You need to keep an eye out for the safety of your cannabis business and the data related to it.

As it’s better to be safe than sorry, keep in mind how these threat’s function will keep you safe from cyberattacks. 

About the author:

Mary Walton is a professional editor, content strategist and a part of MarijuanaDetox team. Apart from writing, Mary is passionate about hiking and gaming. Feel free to contact her via Facebook.

The post 7 Cyber Security Threats In The Cannabis Industry | by Mary Walton appeared first on eForensics.


CTF: Bandit Level 0 > 1 Walkthrough

$
0
0

CTF: Bandit Level 0 > 1 Walkthrough

Technically the first level after SSH into the server, we now need to start finding flags.

Level Goal

The password for the next level is stored in a file called readme located in the home directory. Use this password to log into bandit1 using SSH. Whenever you find a password for a level, use SSH (on port 2220) to log into that level and continue the game.

Commands you may need to solve this level

ls, cd, cat, file, du, find


To start with I am using ‘ls’ which is used to list directory contents, there are many arguments you can use with the command and a very good site I use is https://linux.die.net/man/1/ls which gives you a good breakdown of what can be used.

After running the ls command we see a file called ‘readme’ which we need to open.

The Linux command cat is one of the most frequently used commands on Unix-like operating systems.

It has three related functions with regard to text files: displaying them, combining copies of them and creating new ones.

cat’s general syntax is:-

cat [options] [filenames] [-] [filenames]

The square brackets indicate that the enclosed items are optional.

So we run the following command:-

Cat readme

And we see the flag 😊


From there we exit out of bandit0 and connect to bandit1 inputting the flag as the password, I like to highlight the flag and use my middle mouse scroll button to paste it in

.

See you next time for Bandit Level  1 > 2 Walkthrough

Bandit 0 > 1 = https://overthewire.org/wargames/bandit/bandit1.html


Originally posted: https://thesecuritynoob.com/ctf-walkthrough/ctf-bandit-level-0-1-walkthrough/

The post CTF: Bandit Level 0 > 1 Walkthrough appeared first on eForensics.

Automated Forensic Analysis of Mobile Applications on Android Devices | by Atman Rathod

$
0
0

Automated Forensic Analysis of Mobile Applications on Android Devices


Since mobile apps have penetrated the deepest nooks and corners of our lives, they are increasingly posing security threats of various types for both individuals and business enterprises. Smartphones are now widely used by criminals, people with underworld connections, terrorists and individuals engaged in arson and destruction in public places. This is why, for the administration, establishments and security agencies monitoring smartphone activities and analyzing certain apps have become extremely crucial. 


Smartphone apps process a lot of sensitive user data and a vast majority of this information is stored locally in the device. This is why forensic analysis of app data remains so important.  But digital forensic analysis of mobile data is not an easy job and it involves a lot of complications. Since the process also involves crucial aspects like safeguarding the privacy of information, there should be several precautions taken and safeguard measures followed. 


The Android mobile OS platform represents the most diversified device platform with many mobile devices carrying built-in features, device-level security measures, storage capacities and processing power. This is why when it comes to the forensic analysis of mobile apps on Android devices we need to take extra care of the complexities. 


The Method of Android Forensic Analysis


Since we need to get to the depth of the analysis through in-depth research, we need to begin with the core layers of the apps. The core layers are respectively device logs, network traffic, file system and the device memory. Now, we need to carry out analysis for each of these layers. The evidence-based information from the analysis of these layers will give a full picture about the state of things concerning security vulnerabilities and threat perception. 


As for the composition of the forensic laboratory to carry out this research, two constituents are respectively a MacBook Pro with Android SDK toolkit, a Virtual Machine with Ubuntu 14.04, Nexus 5 running Android 5.1.1 at the root and a WiFi pineapple OS for accessing the web from the smartphone device. Now let's begin our discussion one by one. 


System Logs


Android comes loaded with an extensive range of log analysis tools that allow analyzing a variety of logs. The information can be anything including media events. The information analysis can be used to detect threats received through the SMS and MMS. For example, an SMS coming with malware while the message is getting deleted from the app can be detected through this analysis.   


Network Traffic Analysis 


One of the most crucial parts of the forensic analysis is the analysis of network traffic. Through the analysis of network traffic the threats emerging from the traffic can be analyzed and detected. In any enterprise environment, the firewalls or the proxies are largely able to do this. Remote network traffic analysis is also carried out by many security experts and forensic analysis endeavors. 


To ensure monitoring network traffic on a continuous basis, setting up a great network infrastructure is extremely crucial. For example, for carrying out the analysis we have set up an infrastructure based on Android Pineapple for monitoring the traffic. Within this setup the traffic is monitored through two principal tools, respectively as Wireshark and Burp Suite. The second tool is used in an Android device to carry out SSL inspection. 


Memory Analysis 


Memory analysis of the Android devices is done by some great tools such as Linux Memory Extractor or LiME. The best thing about this tool is that it can be cross-compiled for Android. There are also other effective memory analytics tools such as Volatility. This is a great tool to analyze the deleted dumps of memory. This tool requires creating a custom profile for the Android kernel running on target Android smartphones. 


Apart from the tools and approaches mentioned above, there are other approaches for carrying out memory analysis as well. Android itself provides a “monitor” tool. The only limitation of this tool is that it allows analyzing the memory separately in each specific case instead of analyzing the whole memory at one go. 


How is The Forensic Analysis Done? Exemplifying With an Actual Malware 


For verifying and evaluating the method of analysis, it is important to do the analysis by applying actual malware on the smartphone. The APK needs to be pushed in the kernel of the device system and create a volatility profile on the basis of the customised kernel. 


In this respect you need to take the setup with importance as well. You need to have a clear understanding of how to configure the WiFi setting of the Android Pineapple for MacOS X. All the remaining commands need to be carried out for the purpose of redirecting the HTTP/HTTPS traffic from Android Pineapple to the proxy of the Burp Suite tool.  


At the very next step, it is important to install and run the APK and run it with the appropriate command. At last, you need to run the newly installed malware application on the Android device. While running the application, you need to monitor the logs, detect abnormalities in the network traffic and capture threats in the memory dump. 


Tracking the Logs Through Logcat 


Logcat is used in forensic analysis for the express purpose of amassing evidence from all the messages that are received and sent. This is detected by using the radio logs. The idea behind this is to detect malware threats lurking in the SMS/MMS. Such threats often remain undetected with the use of common malware detection tools and hence, forensic analysis plays such an important role. 


Conclusion


Forensic analysis of Android apps can be done through the manual process as well. But manual digital analysis is often more time and resource consuming and they are less efficient when scaling the scope of analysis when a large number of apps is necessary. This is why automated forensic analysis is popular in most enterprise environments. Since a great number of Android apps are known for information leakage, forensic analysis has become extremely crucial as a security measure. 


Author Bio:

Atman Rathod is the Co-founder at CMARIX TechnoLabs Pvt. Ltd., a leading web and mobile app development company with 13+ years of experience. He loves to write about technology, startups, entrepreneurship and business. His creative abilities, academic track record and leadership skills make him one of the key industry influencers as well.

Social Links:

Linkedin - https://www.linkedin.com/in/rathodatman/

Twitter - https://twitter.com/RathodAtman

Skype: atman.rathod

Medium: https://medium.com/@rathod.atman

Facebook: https://www.facebook.com/CMARIXTechnoLabs/


The post Automated Forensic Analysis of Mobile Applications on Android Devices | by Atman Rathod appeared first on eForensics.

Anti Phishing App: What Is It? How Does It Prevent a Phishing Attack?| by Paul Osborne

$
0
0

Anti Phishing App: What Is It? How Does It Prevent a Phishing Attack?

If you are not new to the digital universe, you already know the increasing security concerns posed by different types of threats and malicious programs. Thanks to the diversity of mobile devices and the app ecosystem across multiple platforms, these security concerns continue to get bigger and multifarious. The security threats for mobility are bigger simply because of the diversity and multiplicity of the mobile landscape as a whole. 

The biggest change to mobile security also erupts from the quick adaptability of the cybercriminals and the range of advanced technologies they have access to. As an increasing number of web traffic is being generated through mobile and as an increasing number of businesses are switching to mobile apps instead of traditional mobile web, mobile security has become the principal face of cyber security. 

In this respect, anti-phishing apps are increasingly playing an enormous role in safeguarding the apps and device platforms from cyber attacks of various types. In fact, to combat the security vulnerabilities and the threats, these anti-phishing apps represent our biggest bait. 


Key Security Challenges for Which Anti-Phishing Apps are Essential

While anti-phishing apps are being widely recommended as effective security measures against cyber attacks and threats, we need to have a gross and comprehensive idea about the security challenges and threats and the way they are evolving over time. 

Let us have a quick look at some of the key security challenges that anti-phishing apps can successfully combat.

  • Email communication common to any enterprise environment is most susceptible to malicious attacks and a range of cyber threats. 
  • Phishing websites represent the second big threat to mobile security, and these websites, through various measures, can steal data and can force users to compromise on data security. 
  • Malicious apps coming loaded with phishing programs or common data compromising threats represent another significant cybersecurity threat. In this respect, we must remember that the modern mobile malware threats are also evolving fast, and they are increasingly getting more sophisticated and lethal. 

Apart from the above-mentioned threats and security concerns that are common to the mobile ecosystem, we can refer to certain signs and common vulnerabilities that need to be addressed by anti-phishing apps or security programs. 

  • Sending web or app traffic to a remote server which looks unreasonable. 
  • Utilizing a lot of memory for simple activities and thus blocking the passage for optimum memory usage for other apps. 
  • Unprotected emails and messaging apps that can frequently accommodate communication from unverified sources. 
  • Mobile apps that have questionable authentication procedures and compromising credential protection measures. 


What is an Anti-Phishing App, and How does it Work? 

Now that we have a comprehensive idea about various security threats and malicious programs that can force a mobile app in regard to security measures, we need to know how anti-phishing apps effectively provide app security and the way they work for safeguarding the mobile apps. 

Anti-phishing apps are basically cybersecurity applications that are capable of detecting phishing content and malicious programs trying to make inroads in the disguise of mobile apps. These anti-phishing apps basically detect the malicious programs by verifying the apps and the threat exceptions with their security database. 


Let us have a quick look at the key features of anti-phishing apps. 

  • As the basic capability, anti-phishing apps can detect malware and malicious content disguised within the email communication. 
  • Anti-phishing apps can carry out checks to thwart spoofs of the email addresses of malicious senders.  
  • They can also provide embedded security measures for Trojans and other malware carried through email content. 
  • They send alerts to the recipient about a fake or malicious email, even if the email appears to have been sent from an official address. 
  • Anti-phishing apps are also capable of blocking phishing websites and malware loaded apps. 
  • Anti-phishing apps generally use a vast and rich database to recognize all types of potential malware and security threats. 


Anti-Phishing Apps Coupled With Preventive Security Measures

Let us be clear about one thing. Anti-phishing apps alone cannot provide the answer to all existing and potential security threats and malware attacks. According to the experts, a whole array of preventive measures is also essential to strengthen the mobile security measure. To prevent mobile phishing, apart from the use of anti-phishing apps, consider the following preventive measures. 

  • Using official mobile apps from the respective Play Store or App Store or avoiding the untrusted or lesser known apps from unknown sources can be a great way to minimize security threats. 
  • Security awareness training for enterprise employees engaged with mobile enterprise apps is another effective way to reduce security vulnerabilities and threat perceptions. 
  • Using safe browsers well equipped with all the essential security features is another effective way to reduce security loopholes and vulnerabilities. 
  • Using bookmarks for accessing common web sources that are frequently used can be a great way to reduce the security threat. 
  • Using a trusted anti-phishing app that takes care of all-around mobile activities and applications is highly recommended as a security measure.


Conclusion 

Finally, anti-phishing apps have already become part and parcel of mobile security measures. But along with these apps, the modern enterprises also need to use a whole array of tested and tried preventive security measures. After all, when it comes to mobile security, they just cannot compromise on any vulnerability or security loophole. 


Author Bio 

Paul Osborne is Chief Technology Officer at Cerdonis Technologies LLC - mobile app development company chicago with core expertise in Android & iOS application development. Since 2006, Paul has developed 100+ mobile apps for all kinds of business, small, medium & large. Paul is passionate about acquiring knowledge regarding new emerging technologies. 


The post Anti Phishing App: What Is It? How Does It Prevent a Phishing Attack?| by Paul Osborne appeared first on eForensics.

How to Become a Digital Forensics Professional | by Rahul Som

$
0
0

How to Become a Digital Forensics Professional

Do you have the talent to make a career in digital forensics? Want to know about the various skills needed for entering the tough domain of cybersecurity? Well, just read on to get answers to your queries and doubts in digital forensics.


What Is Digital Forensics – Why The Hullabaloo?

As a branch of forensic science, digital forensics is becoming a popular domain. Not only does it provide a rewarding career, but it also leads to career advancement opportunities in many industries. Do you know the science of digital forensics can assist in tracking and retrieving stolen data, gaining details of hacks, investigating the causes of incidents and providing the required digital evidence?

If you ever met a digital forensic professional, it must have been exciting for you. Well, just think about it, you met a person that has technical knowledge in cyber crimes and works for criminal justice. No doubt, digital forensics is the best amalgamation of such specifications. Individuals pursuing a career in digital forensics will have certain skills that keep them updated in the ever-evolving digital and forensic industry.


Is The Job Profile Of a Digital Forensics Expert Interesting?

A good awareness of IT knowledge is required for investigating and retrieving cybercrime evidence. Also, they should be able to access data stored on systems and devices, leading to reconstruction and dismantling details as well as a security system. The best quality of a digital forensic professional is that they can carefully retrace the evidence of the cybercrime to the place it happened and be able to find out which security weakness leads to it.

Also, digital forensic professionals will perform activities related to organizing cybercrime evidence into a detailed and clear report. This can be easily accessible to law enforcement, executives, judges, and lawyers. They would even have to explain the reports, provide questions, and be the expert witness in court.

Another major activity forensics experts do is improve the organization’s security by providing advice to improve system security and training employees on various cybersecurity issues. Many companies hire digital forensic experts for security as breaches in data will lead to financial theft, thus damaging the company’s reputation and finances.


Skills Required For Being Digital Forensic Expert

    1. Technical Aptitude

No doubt, the job of a digital forensic expert is primarily technology-focused. It involves the proper knowledge of the digital devices’ working, networking, technical concepts, and good experience in computer systems.

This job even includes working on many technical platforms ranging from computer systems to mobile phones. Keep in mind that sound technical knowledge will help you to find out and respond to various kinds of security hacks and breaches. Some of the major technical skills digital forensics experts must have are –

Networking- Having a good knowledge of the computer network is quite important for digital forensic experts. Not only that, they even need to know about the working methods of servers and LANs. Since the job profile is similar to that of an investigator, they should be aware of the connectivity knowledge and concepts of networking since the investigation is not just limited to individual systems but each and every system connected to the LAN that must be examined.

Digital Comprehension- For being a cyber forensic expert, you should be able to work on many digital devices. You might have to interact with many endpoints like printers, cellphones, USB devices, IoT devices, external hard disks, tablets, digital cameras, projectors, etc., to investigate all kinds of cyberattacks and gather details.  

Knowledge Of Operating Systems- As the investigation is related to cybercrime, you are bound to come across details related to the operating system of the computer. Linux, Windows, and Unix are some of the basic operating systems you need to be comfortable working on. Keep in mind that most of the databases and servers will be based on the Linux operating system. So, being a forensic investigator, you should be able to access them. 

    1. Full Detail About Cybersecurity

As you know, digital forensics is all about cybercrime. For solving any case, you should have good knowledge about the latest threats, breaches, as well as vulnerabilities. While you are training to be a forensic expert, you need to make sure that you have strong, in-depth knowledge of information security and cybersecurity. Without learning cybersecurity concepts, it will be tough for you to guard systems and investigate the crime.

    1. Good Communication Skills

In digital forensics, communication skills play a major role as you have to produce the technical details in a concise way to those present at various levels of technical comprehension. As digital forensic professionals work in a team, they need good communication skills to deliver the process of action related to the forensic case and that, too, in an accurate manner to team members. Sometimes you would have to explain your findings to others, and there might be chances of it being present in the courtroom as a part of the proceedings of the case. 

    1. Analytical Talents

An advanced level of analytical skills is required for being in a career of digital forensics as it involves various processes, like observing cybercrime patterns, analyzing evidence, and interpreting cyber data for solving the case. Having good analytical thinking along with precise observation ability is necessary for uncovering, sorting, and even examining the digital evidence. Such high-level analytical thinking is easily gained and tested in high cyber and military intelligence levels. 

    1. Willingness To Learn

Cybersecurity is constantly evolving and so is digital forensics. Any individual opting for this profession should continuously upgrade to the latest trends in technology for making sure that there is a better job prospect. Continuous self-education and learning, both off and on the clock, are necessary qualities for the digital forensic industry. 


Final Thoughts

As clearly stated above, digital forensics often deals with cybercrime and having good knowledge of criminal laws and investigations. Of course, in this profession, one won’t need a law qualification, but procedures involved in crime investigation can be received through other channels, like group discussion and online reading.


Author Bio :- Rahul Som is a CEO and co-founder of Hopinfirst, one of the top Mobile App development companies that provide best iOS app development and Android app development services. Rahul is passionate about startups, technology and management and blogs frequently on the top.

The post How to Become a Digital Forensics Professional | by Rahul Som appeared first on eForensics.

Walking the Android (time)line. Using Android’s Digital Wellbeing to timeline Android activity | by Joshua Hickman

$
0
0

Walking the Android (time)line. Using Android’s Digital Wellbeing to timeline Android activity

Each time I have created an Android image I have found something new. Google Assistant and Android Auto were results of Nougat and Oreo, and the changes I found in Google Assistant were a result of Android Pie. Android 10 is no exception. While poking around the OS during the data generation period I found Google’s Digital Wellbeing app was tracking how many times I unlocked the test phone each day, which led me to ask “what else was it tracking?” As it turns out, quite a bit. I shared this information with Alexis Brignoni (more on that later) and got to work on some test data after I created the Android 10 image.

Digital Wellbeing is not new. It was introduced to the Pixel line in Android 9, and slowly rolled out to non-Pixel phones. While not present on every Android device, it is required on newer devices. As of September 3, 2019, Google is requiring Digital Wellbeing-like capabilities on all phones that either launch with or upgrade to Android 9 or 10. This is baked into the Google Mobile Services contract, so OEMs who want to use Google services and apps on their handsets will have to comply. Basically, this means while the specific Digital Wellbeing app is not required, tracking certain activities and making that information available to the user is, so it is possible OEMs may implement their own solutions in order to comply. However, it is more likely they will just use Digital Wellbeing. The point is that regardless of which option OEMs choose, the data will be there…somewhere, and in some fashion.

Google wants users to be able to make informed decisions about their digital well being. In order to do this, users need to know how much time they are spending on their phones and how they are using them. Sometimes examiners and investigators need to know that same information in order to make informed decisions during an investigation. Digital Wellbeing can help with both.

Jessica Hyde (@B1N2H3X), Alexis Brignoni (@AlexisBrignoni), and Yogesh Khatri (@SwiftForensics) have done a lot of great work on Usage Stats in Android and how they can be used to track user activity. My hope for this blog post is that it takes their work one step further.

Visually Speaking

Digital Wellbeing is a dashboard for the usage data it collects, and it is fairly easy to navigate. It can be accessed from the Android Settings app. Figure 1 shows the landing page for the app.

Figure 1

Figure 1.  Digital Wellbeing landing page.


The part that is of interest here is the top portion, “Your Digital Wellbeing tools.” As you can see the device is tracking the number of unlocks and the amount of notifications received (red box). You can also see the chart that shows the amount of time I spent on the phone at that particular point in the day; I took the screenshot early in the morning, so I had only been on the phone for a few minutes.

Tapping in the middle of the blue circle brings me to the page seen in Figure 2, which is tracking the amount of time I have been active on my screen. The area in the red box is a drop down menu. The other two choices are “Notifications Received” (Figure 3) and “Times Opened” (Figure 4).

Figure 2
                                                                                       Figure 2.  Screen time. 
Figure 3
                                                                             Figure 3.  Notifications received. 
Figure 4
                                                                                        Figure 4.  Times opened. 

At the bottom of Figures 2-4, you can see how the total amount of time breaks down for each app. Figure 4 is a bit misleading, though. The top of the screen is tracking the number of times the phone has been opened and the number of times each app has been opened is detailed at the bottom.

That’s it. This app has other capabilities, but from an investigative standpoint these are the ones to pay attention to.

Forensically Speaking

To generate test data, I wiped my Pixel 3, flashed it with a clean install of Android 10 (January 2020 patch level), and then rooted it with Magisk. When setting up the phone I took all of the defaults. I did not do anything to the Digital Wellbeing app just so I could see what the default data collection looked like, and I imagine most users will do the same as they probably do not care about this feature. I installed two apps from the Google Play Store, Line and WhatsApp, and generated some test data with them along with some default apps.

The best way to forensically describe Digital Wellbeing is “Usage Stats on steroids.” While this is great for Android, it is not quite as thorough as iOS’s knowledgeC, and it is definiately no where near as “clean” as knowledgeC.  However, examining it is straight forward for two reasons: 1, it is a SQLite database, and 2, it uses the same event type codes as Usage Stats, which are well documented on the Android developer site. In theory, one could merely extract the database, run a quick SQL query, export to CSV, and sort by time. Voila, you have yourself a timeline, right? Well, not quite.

Before we get to the database, let’s take a quick look at where it is stored. The Digital Wellbeing database is aptly named “app_usage” and is in the path /data/data/com.google.android.apps.wellbeing/databases.  See Figure 5.

Figure 5

Figure 5.  The app_usage database.


The table of interest here is “events.”  See Figure 6.

Figure 6.png

Figure 6.  The events table.


This table is simple. Here the timestamps can be seen (in Unix Epoch) along with the event codes for what the app did (column type). Again, these codes are the same as those in Usage Stats, but in Android 10 (API 29) two have been renamed, five new ones have been introduced, and one is not even documented. The codes I have observed in the table are as follows:

1 = ACTIVITY_RESUMED (Formerly MOVE_TO_FOREGROUND)
2 = ACTIVITY_PAUSED (Formerly MOVE_TO_BACKGROUND)
12 = Notification (not documented on the Android Developer site)
18 = KEYGUARD_HIDDEN (indicative of a device unlock-added in Android 9)
19 = FOREGROUND_SERVICE_START (new)
20 = FORGROUND_SERVICE_STOP (new)
23 = ACTIVITY_STOPPED (new)
26 = DEVICE_SHUTDOWN (new)
27 = DEVICE_STARTUP (new)

Some of the names are descriptive enough, but for those that are not you can read about them by visiting the Android Developers page.

The values in the column package_id refer to the values _id in the table packages (Figure 7).

Figure 7

Figure 7.  The packages table.


A SQL query will pull the needed values together in one place and convert them to something human-readable.  Thanks to Alexis for cooking up the query!

SELECT events._id,
datetime(events.timestamp/1000, “UNIXEPOCH”) as timestamps,
packages.package_name, events.type,
CASE
when events.type=1 THEN ‘ACTIVITY_RESUMED’
when events.type=2 THEN ‘ACTIVITY_PAUSED’
when events.type=12 THEN ‘NOTIFICATION’
when events.type=18 THEN ‘KEYGUARD_HIDDEN || DEVICE UNLOCK’
when events.type=19 THEN ‘FOREGROUND_SERVICE START’
when events.type=20 THEN ‘FOREGROUND_SERVICE_STOP’
when events.type=23 THEN ‘ACTIVITY_STOPPED’
when events.type=26 THEN ‘DEVICE_SHUTDOWN’
when events.type=27 THEN ‘DEVICE_STARTUP’
else events.type
END as eventtype
FROM events
INNER JOIN packages ON events.package_id=packages._id

Figure 8

Figure 8.  SQL query output.


Here you can see the same data as in Figure 6, but this time the package_id is replaced with package_name and there is an extra column, eventtype, that translate the column type.

For purposes of this blog post, I exported the SQL query output to a CSV, added two columns, “Human Readable Time” and “Human Readable Activity.”  Then I sorted by time.  See Figure 9.

Figure 9

Figure 9.  Color-coded excerpt of CSV output.


To help decipher this, I have color coded some lines. The orange rows indicate when my device locked, with the package ending in “nexuslauncher” stopping (activity type 23). The next event that shows up is just over two hours later (green rows). In the next two rows (green) you can see nexuslauncher resume (activity type 1), and then the package android appears with the activity type 18 (device unlock). I had locked the phone at 13:32, and then woke it at 15:40 and unlocked it.

The next thing I did a minute later was change the wallpaper. I long-pressed on the home screen and went to the wallpaper gallery. You can see that nexuslauncher paused and then stopped (yellow rows) and then the package ending in “wallpaper” resumed-paused-stopped-resumed (cycled), which is shown in the blue rows. Once I chose my wallpaper I went back to the homescreen (white row), and then the wallpaper package stopped (red rows) since I was done with it.

Looking at the Human Readable Time column you will see that this entire series of actions occur within a minute and a half of each other, and some of those occur at the same second. In that case the sorting is done by the column “_id.” Interestingly enough, I did not find where the values in the _id column were not in chronological order. Not to say that it could not happen, but that I did not find it.

Figure 10 is my next example.

Figure 10

Figure 10.  Second color-coded excerpt of CSV output.


In this figure I had been using the Android Messages app (orange row), and hit the home button to go back to the home screen (blue boxes). I left the phone alone and let the screen timeout on its own (timeout setting was 5 minutes). The phone sat dormant until I unlocked it which took me to the home screen (green rows). I then opened the Line app and started typing (yellow and grey rows).

The red rows are interesting. They all have event ID’s of 12, and they were all written to the database while I was not using the phone (I had left it on my desk with no interaction for over a day). I went back and checked my notes and compared them and this output versus what was in the Digital Wellbeing Notifications dashboard, and, as it turns out, event ID 12 denotes a notification. The thing to note is it could be a notification you can see or cannot see. For example, I had numerous entries for com.android.providers.downloads, however, I have nothing in my notes that indicate I received a notification for that. It is possible Google Play Store downloaded updates in the background and I never saw them (remember I took the defaults at setup). If you looked closely at row 6 in Figure 8 you would see that the setupwizard had a notification. Google’s definition of “notification” may be different than what we traditionally think of for the purpose of Digital Wellbeing.  The point here is that care should be taken in how this data point is interpreted. Examiners/investigators should corroborate event ID 12’s with other data points on the device (e.g. the Messages package has an event ID of 12 and there is a message in the Messages database that is received contemporaneously).

All that being said, the last row in Figure 10 (white) does indicate a notification I received from Line indicating I had received a new message. That was in my notes. 🙂

My last example is shown in Figure 11.

Figure 11.png

Figure 11.  Third color-coded excerpt of CSV output.


In this view, I searched “forensic 4cast awards” from the Google Quick Search Box on the home screen (orange rows). The yellow rows show my navigation to a few web pages, and then returning to the home screen via the home button.

I then initiated a shutdown of the device by using the side button and selecting shutdown. As you can see in the red rows, nexuslauncher is paused, and the event ID code 26 is shown. A little over a minute later I powered on the device (event ID 27).

Once powered on, I was presented with the home screen and prompted for my PIN when I swiped up on the screen. I unlocked the phone (green row) and then started the camera app (white row).

As can be seen by the blue rows, there are other entries for settings, Digital Wellbeing, dialer (phone) and Google Quick Search Box. Those are entries for things that, I believe, start automatically without user intervention. I tested the same shutdown/startup scenario again, and virtually got the same results.  Again, corroboration…

A Few Notes

There are a few things to note about this database. First, this database will not keep data about an app after it has been deleted. I generated a bit of test data in WhatsApp and then uninstalled it. The Digital Wellbeing database had no entries for com.whatsapp. Fortunately, Alexis has done plenty of work with deleted apps in Android and found usage stats for apps that have been deleted remain after the app has been deleted.

Second, there is no documentation about how long Digital Wellbeing keeps its data. I will say that when I created the Android 10 image, I did find data in the database all the way back to when I did a clean install on the device (2020/01/29). There was a little over two weeks of data in there, but I have not tested anything beyond that.

The Google Mobile Services contract states that if OEMs opt to implement their own solution, they have to keep at least a week’s worth of historical data. So, depending on the OEM of the phone on your bench, you may have more or less data than I found, but you should have at least one week of historical activity.

Third, as with all things we do, entries in this database should be corroborated with other data points on the phone.

Finally, because of where this database lives, it is only available if your extraction method can pull data from /data/data. I attempted to extract the database using both the Android Backup and Advanced Logical methods in UFED 4PC 7.28, and both failed to extract this data. The latter may be a symptom of my particular phone since it tends to be a bit tougher to get into than others.

And Finally

If you recall, I mentioned I had shared this information with Alexis. Well, as it customary for him, he has created an awesome utility, ALEAPP, to parse this data. I want to thank him for putting in the time with this and his overall contributions to the DFIR community. His scripts and utilities are fantastic, and, if you are not following him, you are missing out.


Originally posted: https://thebinaryhick.blog/2020/02/22/walking-the-android-timeline-using-androids-digital-wellbeing-to-timeline-android-activity/

The post Walking the Android (time)line. Using Android’s Digital Wellbeing to timeline Android activity | by Joshua Hickman appeared first on eForensics.

YARA tutorial: detecting malicious documents [FREE COURSE CONTENT]

$
0
0

In this video from our Analyzing Malicious Documents course we learn how to set up YARA to detect malicious documents. No theory here, pure practice - you can follow along with the video and learn a new skill. Dive in! 


About the course: 

Word documents, PDFs, photos, and other types of files that are infected with viruses endanger the security of your system every day and cause more computers to be infected. By observing this training course, you will learn how to identify and eliminate the malware that maliciously interact with your files.


What will you learn?

  • Gain knowledge of malware and cyber attacks
  • MS Office and PDF document structure
  • Related malware analysis terminologies
  • Performing static analysis
  • Performing dynamic and runtime analysis
  • Conduct a deep analysis of malicious documents to detect their behavior and command and control server

What skills will you gain?

  • How to analyze malware, with strong focus on suspicious documents
  • Tools: exiftools, oleid, YARA, Malscanner, Offevis, Olevba, ViperMonkey, PDFid, PDFinfo, PDF-parser, AnalyzePDF, PDFExtract, PeePDF, Origami, PDFStreamDumper, Pyew, Malzilla, AntiVM, Anti-sandbox, Crypter, LazyOffice, and others.

What will you need?

  • A PC or laptop with virtualization environment

What should you know before you join?

  • Basic knowledge of security
  • Basic knowledge and experience of Linux

About your instructor: Ali Abdollahi

I’m Ali Abdollahi. I’m a network and cyber security consultant. I have experience in carrier-grade networks and security technology. I‘ve worked in telecom and enterprise companies to secure and optimize their infrastructure and services. I have also done many projects on penetration testing and malware analysis in other sectors.


Course format: 

  • The course is self-paced – you can visit the training whenever you want and your content will be there.
  • Once you’re in, you keep access forever, even when you finish the course.
  • There are no deadlines, except for the ones you set for yourself.
  • We designed the course so that a diligent student will need about 12 hours of work to complete the training.
  • The course contains video and text materials, accompanied by practical labs and exercises.

Related content:

The post YARA tutorial: detecting malicious documents [FREE COURSE CONTENT] appeared first on eForensics.

The Google Maps Service is Not so Safe to Use: 3 Notorious Hacks | by Dominique Rene

$
0
0

The Google Maps Service is Not so Safe to Use: 3 Notorious Hacks

Google Maps, the web search giant’s proprietary geolocation service, is an instrument whose importance is difficult to overestimate these days. Not only does it help people find their way in unfamiliar places, but it also bridges the gap between businesses and potential customers who want to drop by.

However, there are exploitation vectors that may misguide Google Maps users or even get them in trouble. Why on earth would anyone want to do this? Well, there are plenty of reasons. One of them is to sabotage a competitor’s café or store by deceiving clients into thinking it’s currently closed. The other is to get someone ambushed by making them head in the wrong direction.

Believe it or not, some of these stratagems are ridiculously easy and inexpensive to execute. The stories below demystify a few notorious Google Maps Hacks and explain how they work.

Traffic Jams That Aren’t There

In February 2020, a German enthusiast named Simon Weckert spread the word about an incredibly simple way to manipulate Google Maps. All it took was a handcart with 99 used smartphones in it. One more component of the hack was a casual walk around the streets of Berlin with his odd-looking baggage. This innocuous adventure caused the geolocation service to display a red level of road traffic intensity along Weckert’s route. In other words, the person was able to spoof traffic jams.

Here’s the thing: GPS data from mobile devices located within a particular area is one of the sources fueling Google Maps traffic congestion measurement. If the algorithm spots a large number of smartphones in the same street and additionally identifies that these gadgets are moving at a low speed, then it interprets this combo of metrics as a telltale sign of a traffic jam. As a result, most drivers would take a different route to avoid pseudo congestion.

The Ghost Map Trick

Researchers from Microsoft, Virginia Tech, and the University of Electronic Science and Technology of China teamed up to demonstrate a Google Maps hack that can guide a car driver to a wrong destination. Unlike the above hoax involving business listings, this one is more complex than modifying crowdsourced search results. It relies on some equipment furtively attached to a vehicle.

To be precise, the analysts used a Raspberry PI single-board computer, HackRF One radio transceiver, an antenna, and a portable power supply. The total cost of this small-sized kit is just a little over $200. Its primary purpose is to forge satellite signals, replacing them with an attacker’s data.

Although this might seem like a commonplace GPS spoofing attack, the hack has a hallmark that makes it stand out from the crowd. It leverages what’s called a “ghost map” that resembles the real one but has a number of subtle differences. This way, the fake route is less likely to raise red flags. In the proof-of-concept under scrutiny, these faux maps were based on a dataset of 600 taxi trips taken in Boston and Manhattan.

When the hack is underway, a specially crafted attack algorithm determines the victim’s current whereabouts and finds a “ghost map” that closely matches this route. Then, the radio equipment transmits spoofed GPS signals so that the target’s Google Maps service is fooled into showing a rogue path.

Restaurant Closed? Not Really

A longstanding eatery called “Serbian Crown” in Great Falls, Virginia was once a popular place among gourmets. Famous for exotic meals in its menu, such as lion and kangaroo meat, it had been a prosperous business for almost 40 years until 2012 when things started getting out of hand. The owner, Rene Bertagna, found himself perplexed over a dramatic decline in the number of visitors for ostensibly no evident reason. It started out of the blue and went on for months.

The entrepreneur would have probably stayed clueless about the cause of this nosedive if one of the remaining customers hadn’t drawn his attention to a bewildering fact. The restaurant’s working hours shown on Google Places (now rebranded as Google My Business) turned out to be totally incorrect. The local business listings service relying on Google Maps misleadingly stated that “Serbian Crown” was closed on weekends, the time when the number of clients typically reached its peak.

It appeared that somebody had skewed information in Google listings to discourage visitors from going to the restaurant. This impacted the business badly because it was in a location with hardly any transit traffic, so people usually went there because they intended to. Having seen the “Closed” status on Google Places, a customer simply changed their mind and picked another place instead.

The dodgy tweak was most likely made by a competitor, although nobody was ever caught red-handed doing it. It took the owner more than a year to sort things out. He hired an Internet consultant who fixed the listings. By that time, though, he had lost most of his customers and fired some of the personnel. This made Bertagna call it quits and close the place – for real this time.

The fight for justice went on in the legal domain as the entrepreneur filed a lawsuit against Google. He and his lawyer boiled the case down to imperfections of Google Maps, which supposedly allowed an adversary to ruin his business by modifying the listings.

As a matter of fact, these claims make quite a bit of sense. The loopholes stem from the crowdsourcing gist of the service. It means a fraudulent community edit or bogus business profile may distort the online presence of an enterprise, and Google’s verification mechanisms aren’t effective enough to thwart this. There are quite a few similar examples of exploitation, including millions of fake listings with spammy company names. The biggest issue is that Google appears to have a hard time differentiating phony profiles from real ones. In spite of these evident flaws, Bertagna got nowhere with the lawsuit.

The Bottom Line

Google Maps is definitely an awesome service, and yet it’s far from being flawless. Cybercrime statistics show us that nothing can be safe these days. The Google Maps service turns out to be susceptible to exploitation – from inundating location-based business listings with fake profiles and inaccurate information, to displaying spoofed maps and simulating traffic jams. The terrifying thing is that these hacks can go beyond the cyber realm and have real-world consequences for people. With that said, Google engineers should rethink some of the anti-fraud and security implementations related to their navigation services to make sure that regular users are on the safe side.


About the author: Dominique René is a young content writer who is currently working for MacSecurity.net. She is inspired by the present-day groundbreaking technological progress. Dominique’s overwhelming enthusiasm for tech matters stems from her current research in college and innate aspiration to expand her academic outlook. She’s committed to staying on top of innovative trends in computer security, online privacy, threat intelligence, cryptocurrencies, and cloud solutions.

The post The Google Maps Service is Not so Safe to Use: 3 Notorious Hacks | by Dominique Rene appeared first on eForensics.


CoronaVirus Themed Malspam (Hancitor malware) | By Siddharth Sharma

$
0
0

CoronaVirus Themed Malspam (Hancitor malware)

Dramatic events are usually used by malicious actors when this kind of outbreak is there, yes I am talking about COVID 19, here dramatic events used by malicious actors means gaining the emotions of the people to their profits. Meanwhile I was reading about these spams, I came through this malicious tracker which we will be looking further in this article. We will be doing technical analysis of this malicious hancitor tracker, hancitor malware was created in 2014 to drop other malwares on infected machines. It’s aliases are Tordal and Chanitor. The malicious PCAP file has been taken from malware traffic website.

Nowdays using COVID 19 theme this is spreading as malspam of which a screenshot is shown below:

souce:tweet by @mesa_matt

Now lets analyze this spam, Let’s first analyze the malicious PCAP:

Technical Analysis:

1.On loading this pcap in Network Miner, below was the result:

2.On extracting this zip file for further analysis, it was found that it contained only one file named CA215720011352.vbs, it was a genuine vbs file, on checking this ,it was found to be heavily obfuscated(Junk code was there), but on scrolling down, actual intent of this file was shown:

3.As it can be seen, it uses wscript.exe for AV evasion and execution, also on running this file, below was the result i.e. temp_adobe_123452643.txt named file was dropped in temp location for persistence.

4.This was actually a DLL file as when it was viewed this in hex viewer MZ was the file header. As we saw above(in 2.) the script used regsvr32 service, to run or register this DLL.

It seems to be signed from a chinese organisation, original name of the file appears to be SystemRegistryClean.exe

5.Clearly this DLL uses RunPE technique a.k.a process hollowing as it creates svchost.exe process under the hood. As shown there is an executable code written into the process(on putting BP on WriteProcessMemory),  on following this code section in memory map and dumping it, gives no useful result so we switch to IDA for more details.

But before that while the above process(no.4) was running I thought to view the network traffic and luckily an IP address was visible establishing connection with the host as shown below:

A connection was established as it can be seen above, on checking that ip address(54.225.71.235) it was found to be malicious that is it was already reported.

6.Lets look into more details:

7.A lot of Registry apis were used, on viewing this in x64dbg below was shown:

Similar Reg Key was used in Emotet Banking Trojan, “interface\{aa5b6a80-b834-11d0-932f-00a0c90dcaa9}” which is passed as a parameter to RegOpenKeyA. This registry key is required for the Windows scripting engine interface IActiveScriptParseProcedure to function. However on digging more into this DLL, some virtual key related apis were also found as it seemed it was tracking the users activity of the clipboard as shown below:

Also:

Some analysis screenshots of app.any.run sandbox shown below:

1.First it drops(as analyzed above)

2.Then it uses WMI(Windows Management Instrumentation) mainly for defense evasion and for gathering information for Discovery and remote Execution of files as part of Lateral Movement.

3.Also It reads the Internet Cache settings, the Registry contains a significant amount of information about the operating system, configuration, software, and security.

4.Meanwhile it makes a network connection as shown:

Related IOCs

– 149.129.103.226 port 80 – new.915yzt.cn – GET /wp-includes/rmdrinkwater.php?t=TW9uLCAxNiBNYXIgMjAyMCAyMDoxNzoxNSArMDMwMA==

– 8.208.77.171 port 80 – bookkeepingpluspros.com – GET /852435_34859.php?eXYI2DfB6=eXYI2DfB6&t=TW9uLCAxNiBNYXIgMjAyMCAyMDoxNzoxNSArMDMwMA==

– port 80 – api.ipify.org – GET /

– 5.134.119.226 port 80 – bralibuda.com – POST /4/forum.php

– 5.134.119.226 port 80 – bralibuda.com – POST /mlu/forum.php

– 107.180.2.58 port 80 – primecaviar.com – GET /1

– 107.180.2.58 port 80 – primecaviar.com – GET /2

– 5.134.119.226 port 80 – greferezud.com – POST /4/forum.php

– 5.134.119.226 port 80 – deraelous.com – POST /4/forum.php

375d196227d62a95f82cf9c20657449ebea1b512d4cb19cdfe9eb8f102dd9fae

12f87dd075fc12c2b6b15a1eb5ca209ba056bb6aa2feaf3518163192a17a7a3b

81d39594ab90e9841c7df9e82e977d7a2ecd26045e80885360502e1e79957f92

0caef2718bc7130314b7f08559beba53ccf00e5ee5aba49523fb83e1d6a2a347

0e03a0e73670a94c5c1efcbf7512b0eca8ca899e58ed6dca2b12c8fcb31ccfb4

0b8800734669aa7dbc6e67f93e268d827b5e67d4f30e33734169ddc93a026d2e

About Siddharth:
  • Student currently pursuing bachelors of technology (Computer Science)
  • Interested in malware analysis,reversing and forensics.
  • Did internship at Computer Emergency Response Team,India (CERT-In)

The article was originally published here: https://threatblogs.wordpress.com/2020/03/23/coronavirus-themed-malspamhancitor-malware/

The post CoronaVirus Themed Malspam (Hancitor malware) | By Siddharth Sharma appeared first on eForensics.

Skygofree Spyware | By Siddharth Sharma

$
0
0

Skygofree Spyware

INTRODUCTION

Active since 2014, skygofree (named on the basis of domains used in the application) is being called the most advanced android malware with powerful spying capabilities such as—

  • Location-based sound recording through the microphone of an infected device – recording starts when the device enters a specified location
  • Abuse of Accessibility Services to steal WhatsApp messages
  • Ability to connect an infected device to Wi-Fi networks controlled by the attackers

Below is the analysis of one of the samples obtained which clearly shows how much harmful this spyware is.

ANALYSIS

Below image shows the permissions this app has, clearly shows that this app once installed asks for a lot of permissions from the user and further it carries on its exfiltration activity like call records, text messages, geolocation, surrounding audio, calendar events, and other memory information stored on the device etc..

Also, services used by this app were:

Service Name                                 Purpose

AndroidAlarmManager Uploading last recorded .amr audio

AndroidSystemService   Audio recording

AndroidSystemQueues Location tracking with movement detection

ClipService         Clipboard stealing

AndroidFileManager      Uploading all exfiltrated data

Now once the app is installed attackers can command(which we will look shortly) and control remotely by using some protocols like via HTTP,XMPP,FirebaseCloudMessaging service(which is in this case) as can be seen below:

Afterthat as we dig more into the code, we can see below that after giving certain permissions by the user this malicious app collects all sort of user data from local database like of whatsapp,facebook,gmail etc. using Social command as this command starts the ‘AndroidMDMSupport’ service – this service allows the files of any other installed application to be grabbed.

Along with this it also uses camera command to record a video or capture the image and uploads it.

Some other commands which it uses are:

Install_apk         to install apks from the URL

Sms       to steal text messages

Whatsapp_msg to steal whatsapp message database from memory card

History steal browser history and upload it as shown below.

wifi command is used to connect the victim to a Wi-Fi network controlled by the adversaries to perform sniffing and man-in-the-middle (MitM) attacks.

Along with these as shown above, it also looks for the databases of other apps as hardcoded below:

Some other malicious activities

Below images are some of the the services this app uses for its malicious activities:

As can be seen it reads the phone states to get serialnumber,uid etc. of the device.

It also uses NotificationListener Service as can be seen in the below image.

From below image it can be seen that app uses AndroidCallSystem Service to get call logs and numbers from the user’s device and then it uploads it to the attacker’s server.

Also, by using AndroidFileManager service it uploads all the user’s documents as well.

Image shown above shows the URL to which this malicious app connects to perform its malicious activities:

Not only this, advanced versions of this app has more capabilities like dropping payloads, exploit payloads further using CVEs and getting the reverse shell.

CONCLUSION

As we saw above that the skygofree tool has a lot of capabilities as being seen in the wild.With some  exceptional capabilities like usage of multiple exploits to gain root privilege,never-before-seen surveillance features such as recording surrounding audio in specified locations,stealing private databases of other installed apps, this app proves to be a very dangerous application.

About Siddharth:
  • Student currently pursuing bachelors of technology (Computer Science)
  • Interested in malware analysis,reversing and forensics.
  • Did internship at Computer Emergency Response Team,India (CERT-In)

The article was originally published here: https://threatblogs.wordpress.com/2019/11/06/skygofree-spyware/

The post Skygofree Spyware | By Siddharth Sharma appeared first on eForensics.

COVID-19 Present Increased Risk of Child Sexual Exploitation - This is what we can do to safeguard children | By ANNA BORGSTRÖM

$
0
0

COVID-19 Present Increased Risk of Child Sexual Exploitation - This is what we can do to safeguard children

Due to school closings as a result of COVID-19, experts agree that children will have an increased online presence and be in a position that puts them at an inadvertent risk. This week the FBI was seeking to warn parents, educators, caregivers, and children about the dangers of online sexual exploitation and signs of child abuse with this article: https://www.fbi.gov/news/pressrel/press-releases/school-closings-due-to-covid-19-present-potential-for-increased-risk-of-child-exploitation

Dating back to 2015, NetClean issue a yearly report on child sexual abuse. Our data is gathered across the world from police officers who specialize in child sexual abuse crimes. We have over the years collected data on the material found in child sexual abuse investigations and this what we have found out about grooming and sexual extortion.

Images produced as a result of grooming

These images have been produced and sent to the offender as a result of grooming. Grooming is a process whereby the offender slowly builds up a relationship with a child to win their trust and confidence.

Images produced as a result of sexual extortion

These images have been produced as the result of threats and extortion, often referred to as “sextortion”. Grooming can develop into sextortion, or the offender might threaten the child from the start.

In the grooming process the offender builds a relationship with the child to win their trust and confidence. Sexual extortion is when children are threatened into sending images or videos of themselves.

 Grooming and extortion material is on the rise

Two thirds of the police officers in the NetClean Report 2018 answered that images and videos that have been produced as a result of grooming are common or very common in their investigations. Nearly as many reported that sexual extortion is equally common. More than half of the respondents said that both these types of material are increasing.

 Data from NCMEC (the National Center for Missing and Exploited Children) confirms these trends, but points to an even steeper increase in these types of material. They also comment that there are a large number of hidden cases, as the majority of victims don’t come forward and report the abuse.

 Age of the children (victims) depicted in the material

 NCMEC report that 78 percent of the children in their reported cases are girls, in the ages between 8 to 17. The surveyed police officers in the NetClean Report 2018 reported that they see even younger children than that. Though 8-16 were reported to be the most common ages, 16 percent of the surveyed police officers reported that they had seen cases with children younger than 5 years old.

 Extorted for images

The children in those cases are most commonly extorted for more undressed images. More than 96 percent of the surveyed police officers answered that children were extorted for more images. In some cases they are also extorted for money, but this is less common.

Types of threats

The most common threat that children are subjected to is that the images of them will be posted online or sent to someone that they know. 97 percent of the surveyed police officers answered that. Sometimes threats are also made towards the child’s family, or other types of threats are made, but again this is less common.

 Live-streamed child sexual abuse material

Half of the surveyed police officers also reported that live-streamed material as a result of grooming or sexual extortion is common or very common. One third answered that this is the most common type of live-streamed material that they see in their investigations.

A brighter future for children

Parents and guardians regardless of country can take the measures FBI is proposing in the article to help educate and prevent children from becoming victims of child predators and sexual exploitation during this time of global emergency.

But the responsibility to safeguard children cannot only be put on the parents or the children themselves. To effectively fight the spread of child sexual abuse material, different technologies must be applied by all who use the internet and have an interest in making it a safe space for future generations. If all businesses and organisations in the world – billions of computers and networks – took appropriate action, the opportunity to find and disrupt the spread of online child sexual material would increase infinitely.

 Read more at https://www.netclean.com/the-netclean-report/

Originally published on Linkedin: https://www.linkedin.com/pulse/covid-19-present-increased-risk-child-sexual-what-we-anna-borgstr%C3%B6m/

The post COVID-19 Present Increased Risk of Child Sexual Exploitation - This is what we can do to safeguard children | By ANNA BORGSTRÖM appeared first on eForensics.

Windows Registry extraction with FTK Imager [FREE COURSE CONTENT]

$
0
0

There are several ways to perform an extraction from the Windows Registry, let’s see some of the most useful.


This excerpt comes from our Windows Registry and Log Analysis online course by Luca Cadonici. 


On a running machine, you can perform a backup of the registry using the Windows Graphical Interface or using the command shell or PowerShell. In the first way, just launch the regedit command in the cmd shell to open the graphical version of the registry.

Figure 2.4.1

To export the entire registry right-click on the computer icon and select “export” to save a .reg file in a folder of your choice.

Figure 2.4.2

To export a single item, just expand or collapse the keys until you find the one you need. Note that at the bottom of the window, the export range for the selected branch is shown.

Figure 2.4.3

You can do the same from PowerShell using the following syntax:

reg export [PATH TO KEY] [DESTINATION FOLDER] [FILE NAME.reg]

e.g. reg export HKLM\Software E:\export\software.reg will export software key and its subkeys to the folder E:\export creating a file named software.reg

Figure 2.4.4

Both the previous procedures are useful to create a backup .reg file of the registry that you can import later in case of trouble and I really, really suggest you to make a backup every time you’re attempting to change something in the registry.

Using a more forensic approach, you can export registry hives using FTK Imager, a free tool by AccessData used mainly for forensics imaging and file-system analysis but, as we will see, very versatile and capable of extracting a mine of information from running systems or from forensic images.

To extract registry hives from a running system, you can copy on a USB drive the executable of FTK Imager Lite, a stand-alone version of the previous tool used to conduct forensics imaging with the least possible interaction with the running machines. This characteristic makes it great for acquisitions from server.

Then you must mount the flash drive into the machine and select File Obtain Protected Files   Password recovery and all registry files.

Pay attention to the fact that this procedure can be used only to extract the registry from the machine you are working on, and not on forensic images or on remote machines.

Figure 2.4.5

Finally, in the directory that you have chosen for the export, you will find six files (default, SAM, SECURITY, software, system, userdiff) and the folder Users.

Default HKEY_USERS\DEFAULT
SAM HKEY_LOCALMACHINE\SAM
SECURITY HKEY_LOCALMACHINE\SECURITY
Software HKEY_LOCAL_MACHINE\SOFTWARE
System HKEY_LOCAL_MACHINE\SYSTEM

Inside the folder Users, we can find at least two folders, default and public, containing an NTUSER.DAT file, the one that stores all user's registry settings (HKEY_CURRENT_USER).

Working with a forensics image, you can follow the same steps with the image that you’ll have previously mounted as an Item on FTK Imager (or Imager Lite if you prefer).

To do this, you must launch FTK Imager and then click FileAdd Evidence ItemImage file and then click on your image.

To extract Registry files you must search in the directory at the path %SystemRoot%\System32\Config, right-click on the file you need them and then select the export option.

Figure 2.4.6

To extract the NTUSER.DAT file you must repeat the procedure inside the folder at the following path C:\Users\[USER] and then export the file related to the user’s account you’re interested in.

Figure 2.4.7


Related Posts

The post Windows Registry extraction with FTK Imager [FREE COURSE CONTENT] appeared first on eForensics.

3 Cybersecurity Must-Do’s that IP Geolocation Can Enhance | From Ipify

$
0
0

| sponsored post |

3 Cybersecurity Must-Do’s that IP Geolocation Can Enhance

Finding out the source of any threat is a must if an organization under attack wishes to address it. That is what makes IP addresses critical resources for any forensic analyst. Not to mention the fact that it is entirely legal for companies to know more about users by looking at their IP addresses.

What’s more, identifying a user’s IP geolocation can significantly improve the effectiveness of existing cybersecurity initiatives. In fact, many security incidents are avoidable if networks regularly monitor the IP addresses that they come into contact with. That said, we identified at least three cybersecurity processes that using solutions like IP Geolocation API can improve.

Cybersecurity Processes That IP Geolocation Can Help With

In an era where hackers attack every 39 seconds or an average of 2,244 times a day, every organization, regardless of its size, needs to be on a constant lookout for threat sources to stay safe. One way of doing that is by ridding networks of bad IP addresses. Here are three specific cybersecurity musts that can use the help of IP Geolocation API:

1. User Access Management

Any company that handles and stores users’ personally identifiable information (PII) must have a robust user access management (UAM) system in place. That would ensure that only authorized users can access sensitive data. UAM also enables organizations to comply with mandatory regulations such as the GDPR, the Health Insurance Portability and Accountability Act of 1996 (HIPAA), the Sarbanes-Oxley Act (SOX), and the Control Objectives for Information and Related Technology (COBIT).

IP Geolocation API can help cybersecurity teams limit the systems and devices that can connect and access files on their network. It is usual for companies to segregate files and folders based on whether they are for internal or external consumption. Files and folders tagged as “internal access only” often contain proprietary information. Access to these can be limited to IP addresses assigned to employees deemed authorized to view them.

2. Firewall Use

Firewalls are typically employed to screen all incoming and outgoing connections. They provide a fundamental layer of defense against cyber attacks.

IP Geolocation API can be integrated into a firewall to enable it to scan IP addresses before these are allowed access to network resources. Security teams can input all company-owned IP addresses so these won’t get blocked at any time. External IP addresses, meanwhile, can be subjected to an additional check before being allowed into the network. You can, for instance, query them on a malicious IP address database or blacklist. If they happen to have ties to criminal activities, then you can instantly block their access, thus preventing potential attacks.

3. Distributed Denial-of-Service (DDoS) Prevention

These days, DDoS attacks can be considered one of the most debilitating threats to any organization. Victims’ sites can go offline for hours, sometimes even days, which has the effect of shutting down their operations. And while advanced DDoS prevention solutions help, it doesn’t hurt to add another layer of security in the form of an IP geolocation solution.

IP Geolocation API can help pinpoint, for instance, where bad traffic mostly comes from during an ongoing DDoS attack. Closing the network to IP addresses originating from the identified locations while the attack is in progress may help address the issue until at least all threat sources are identified for permanent blocking.

Identifying the source of cyberattacks is crucial in the fight against threat actors. It is, after all, the most effective way to address a threat. Blocking threats from the source is, however, impossible if you can’t pinpoint where they’re coming from. That is where solutions like IP Geolocation API can help.

About the Author

Ipify is a public IP data provider that works flawlessly with both IPv4 and IPv6 addresses. We offer three main products: A general IP API that allows making millions of requests per minute using a variety of programming languages, a more specific IP Geolocation API with all relevant location data points, as well as an IP Geolocation Database that contains 8+ million IP blocks and locations for close to 5 million records.

The post 3 Cybersecurity Must-Do’s that IP Geolocation Can Enhance | From Ipify appeared first on eForensics.

Viewing all 378 articles
Browse latest View live


Latest Images